Metal processes
The following page of notes will cover:
- Forming methods
- Joining methods
- Wasting processes
Forming methods
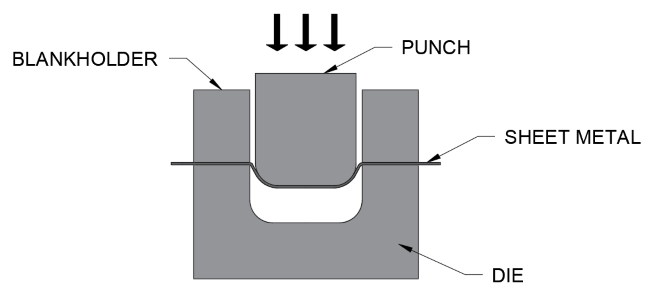
Press forming:
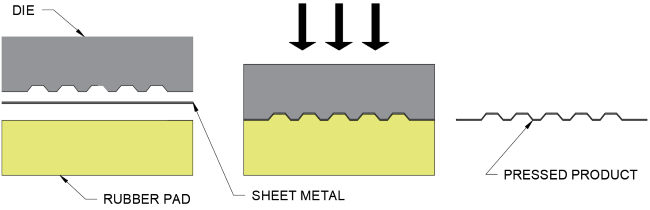
How it works:
- Metal is rolled out and straightened
- Metal is cut to required blank size
- The blank metal is clamped over the die and held in the correct position using the back gauge
- A hydraulically operated punch is then pushed into the sheet metal
- Once the desired shape is formed the punch is retracted and the sheet component is ejected
| Advantages | Disadvantages |
|---|---|
|
|
Uses: Automotive parts, appliance components
Spinning:
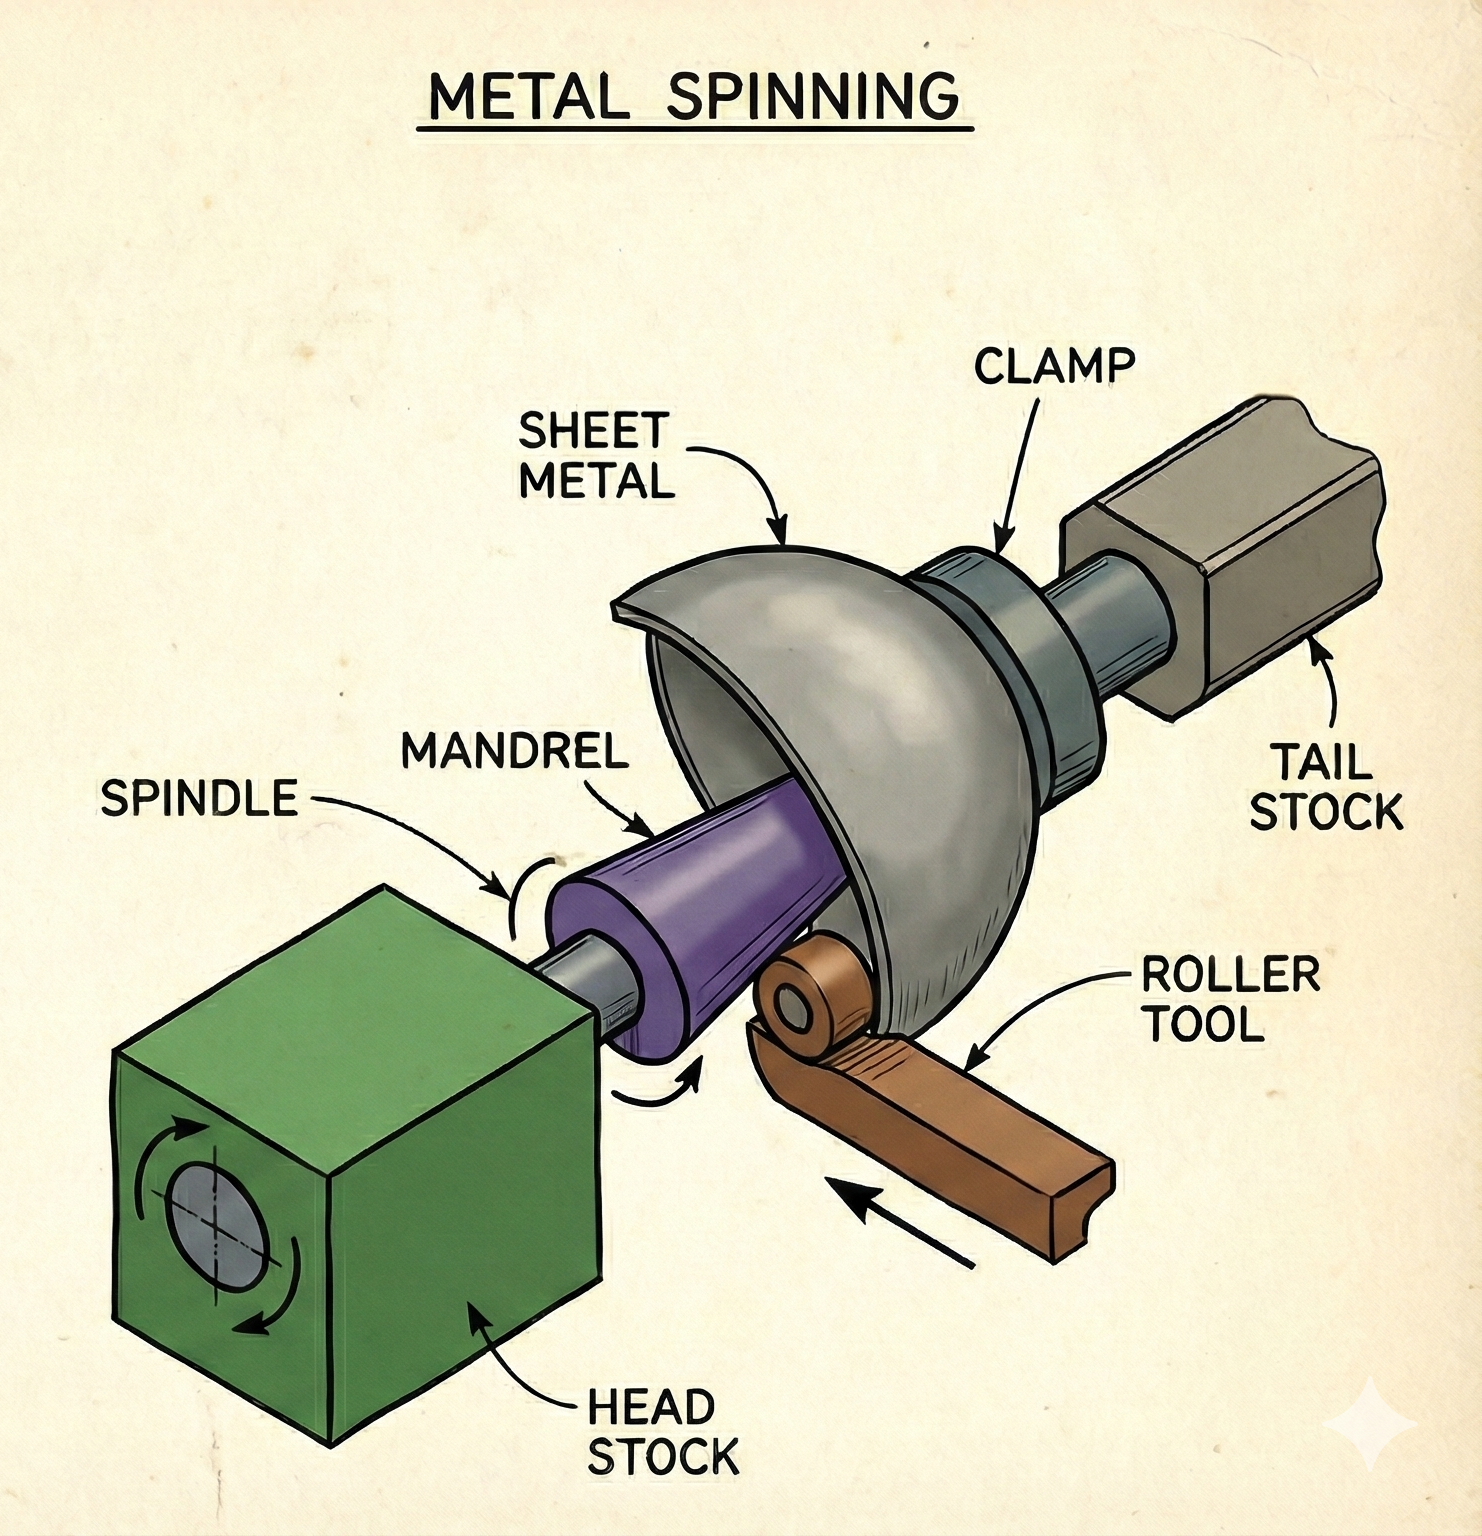
How it works:
- A metal disk is mounted on a spindle and rotated at high speed
- A tool is applied to the spinning disk to shape it into a hollow form
- The formed piece is then removed from the spindle
| Advantages | Disadvantages |
|---|---|
|
|
Uses: Bowls, cones, cookware
Cupping:
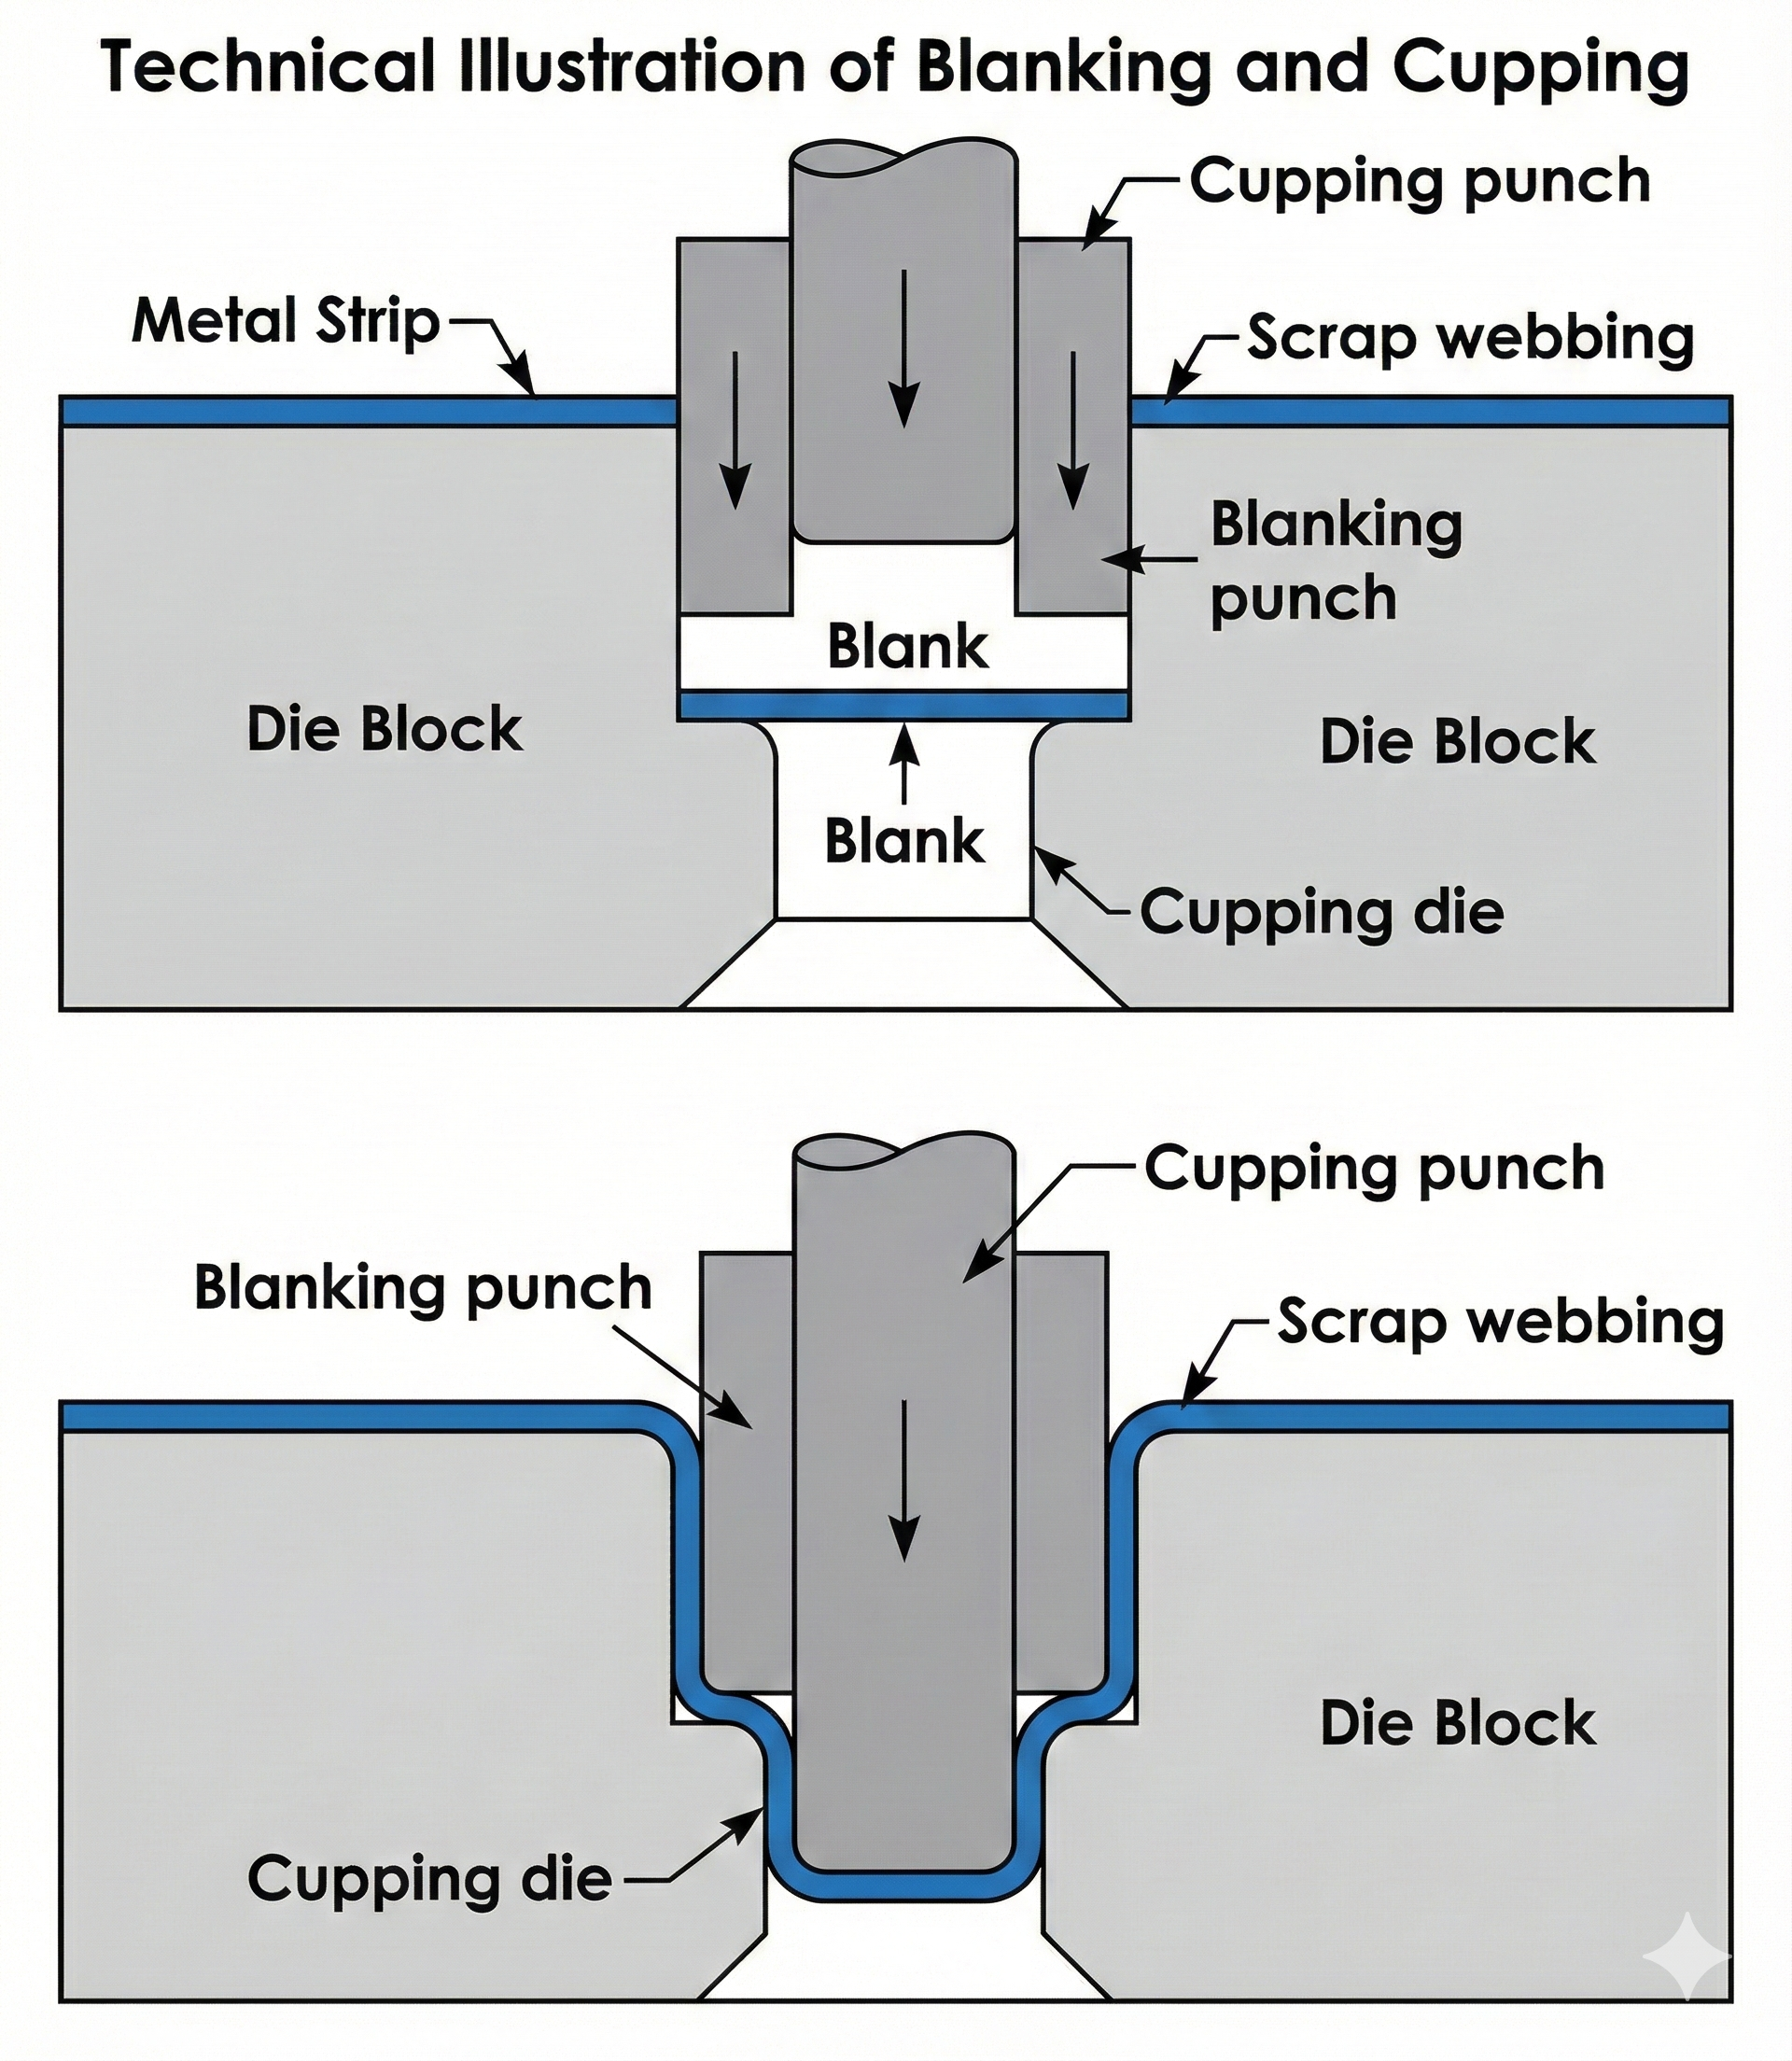
How it works:
- A flat sheet of metal is placed into a die
- A punch presses down on the metal, forming it into a cup shape
- The finished cup is removed from the die
| Advantages | Disadvantages |
|---|---|
|
|
Uses: Drink cans, containers, automotive parts
Deep drawing:
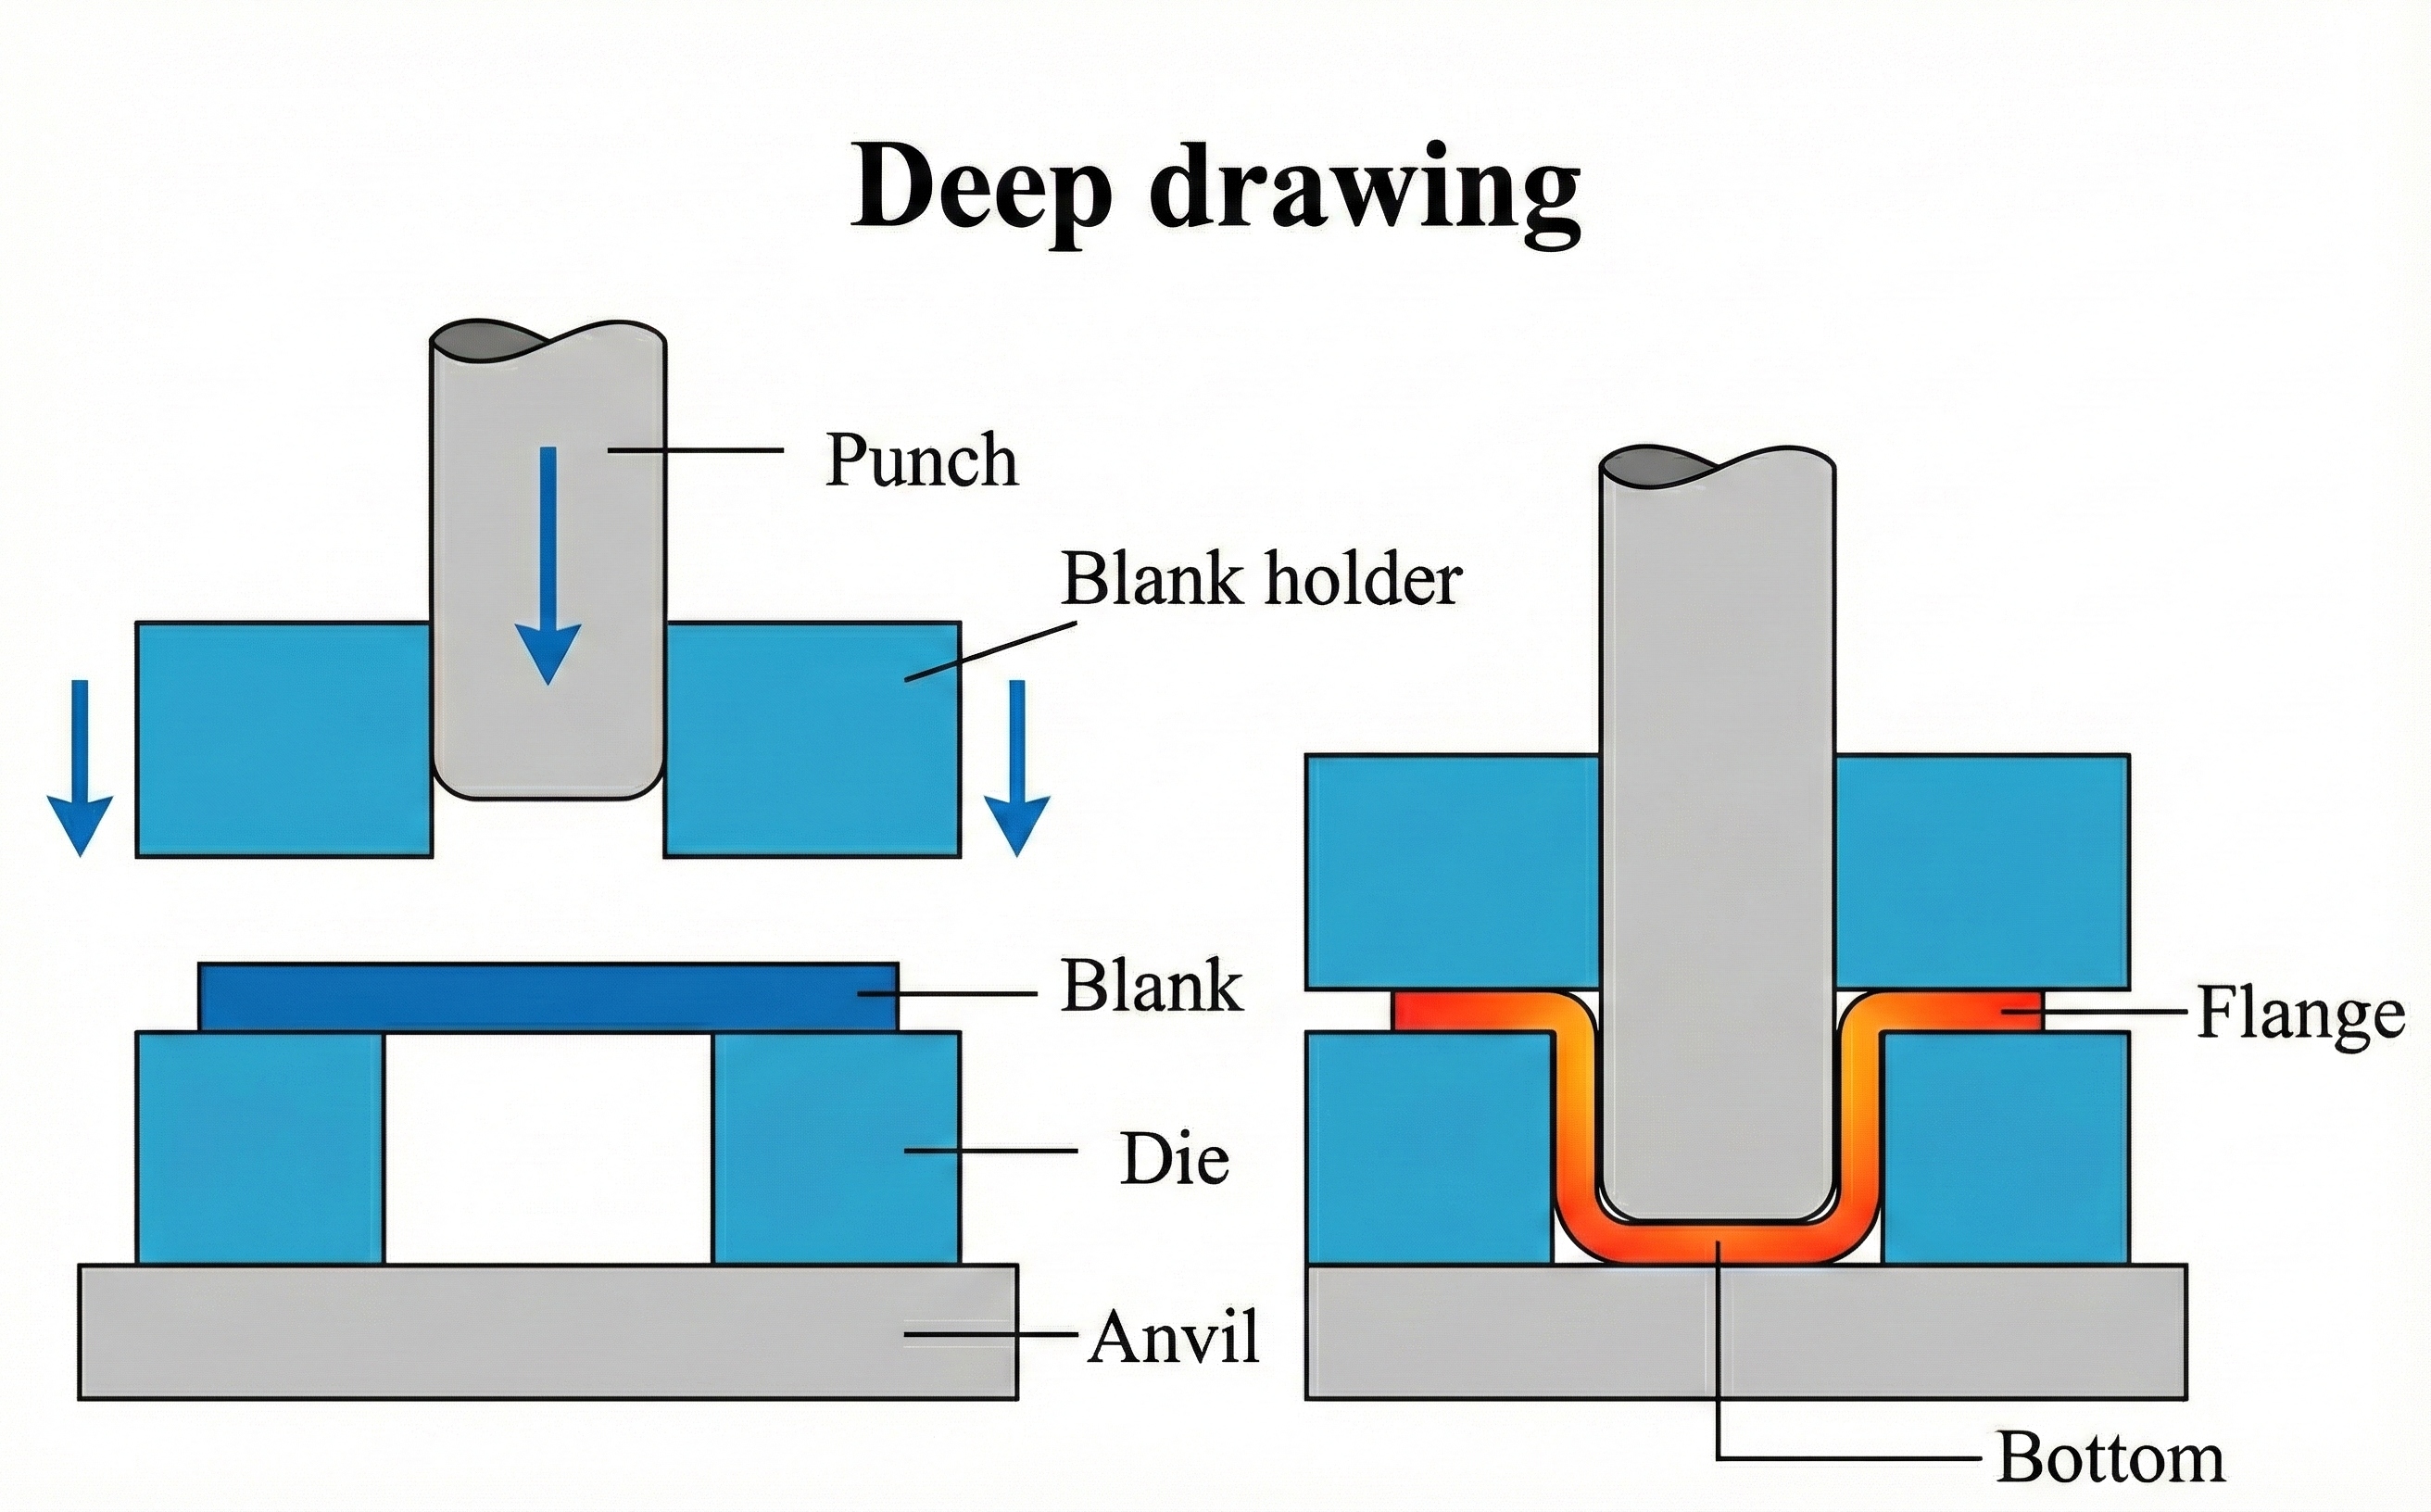
How it works:
- A metal sheet is placed in a die with a punch
- The punch draws the sheet into the die, forming a deep, hollow part
- The formed part is then removed and finished
| Advantages | Disadvantages |
|---|---|
|
|
Uses: Automotive body parts, kitchen sinks, gas tanks
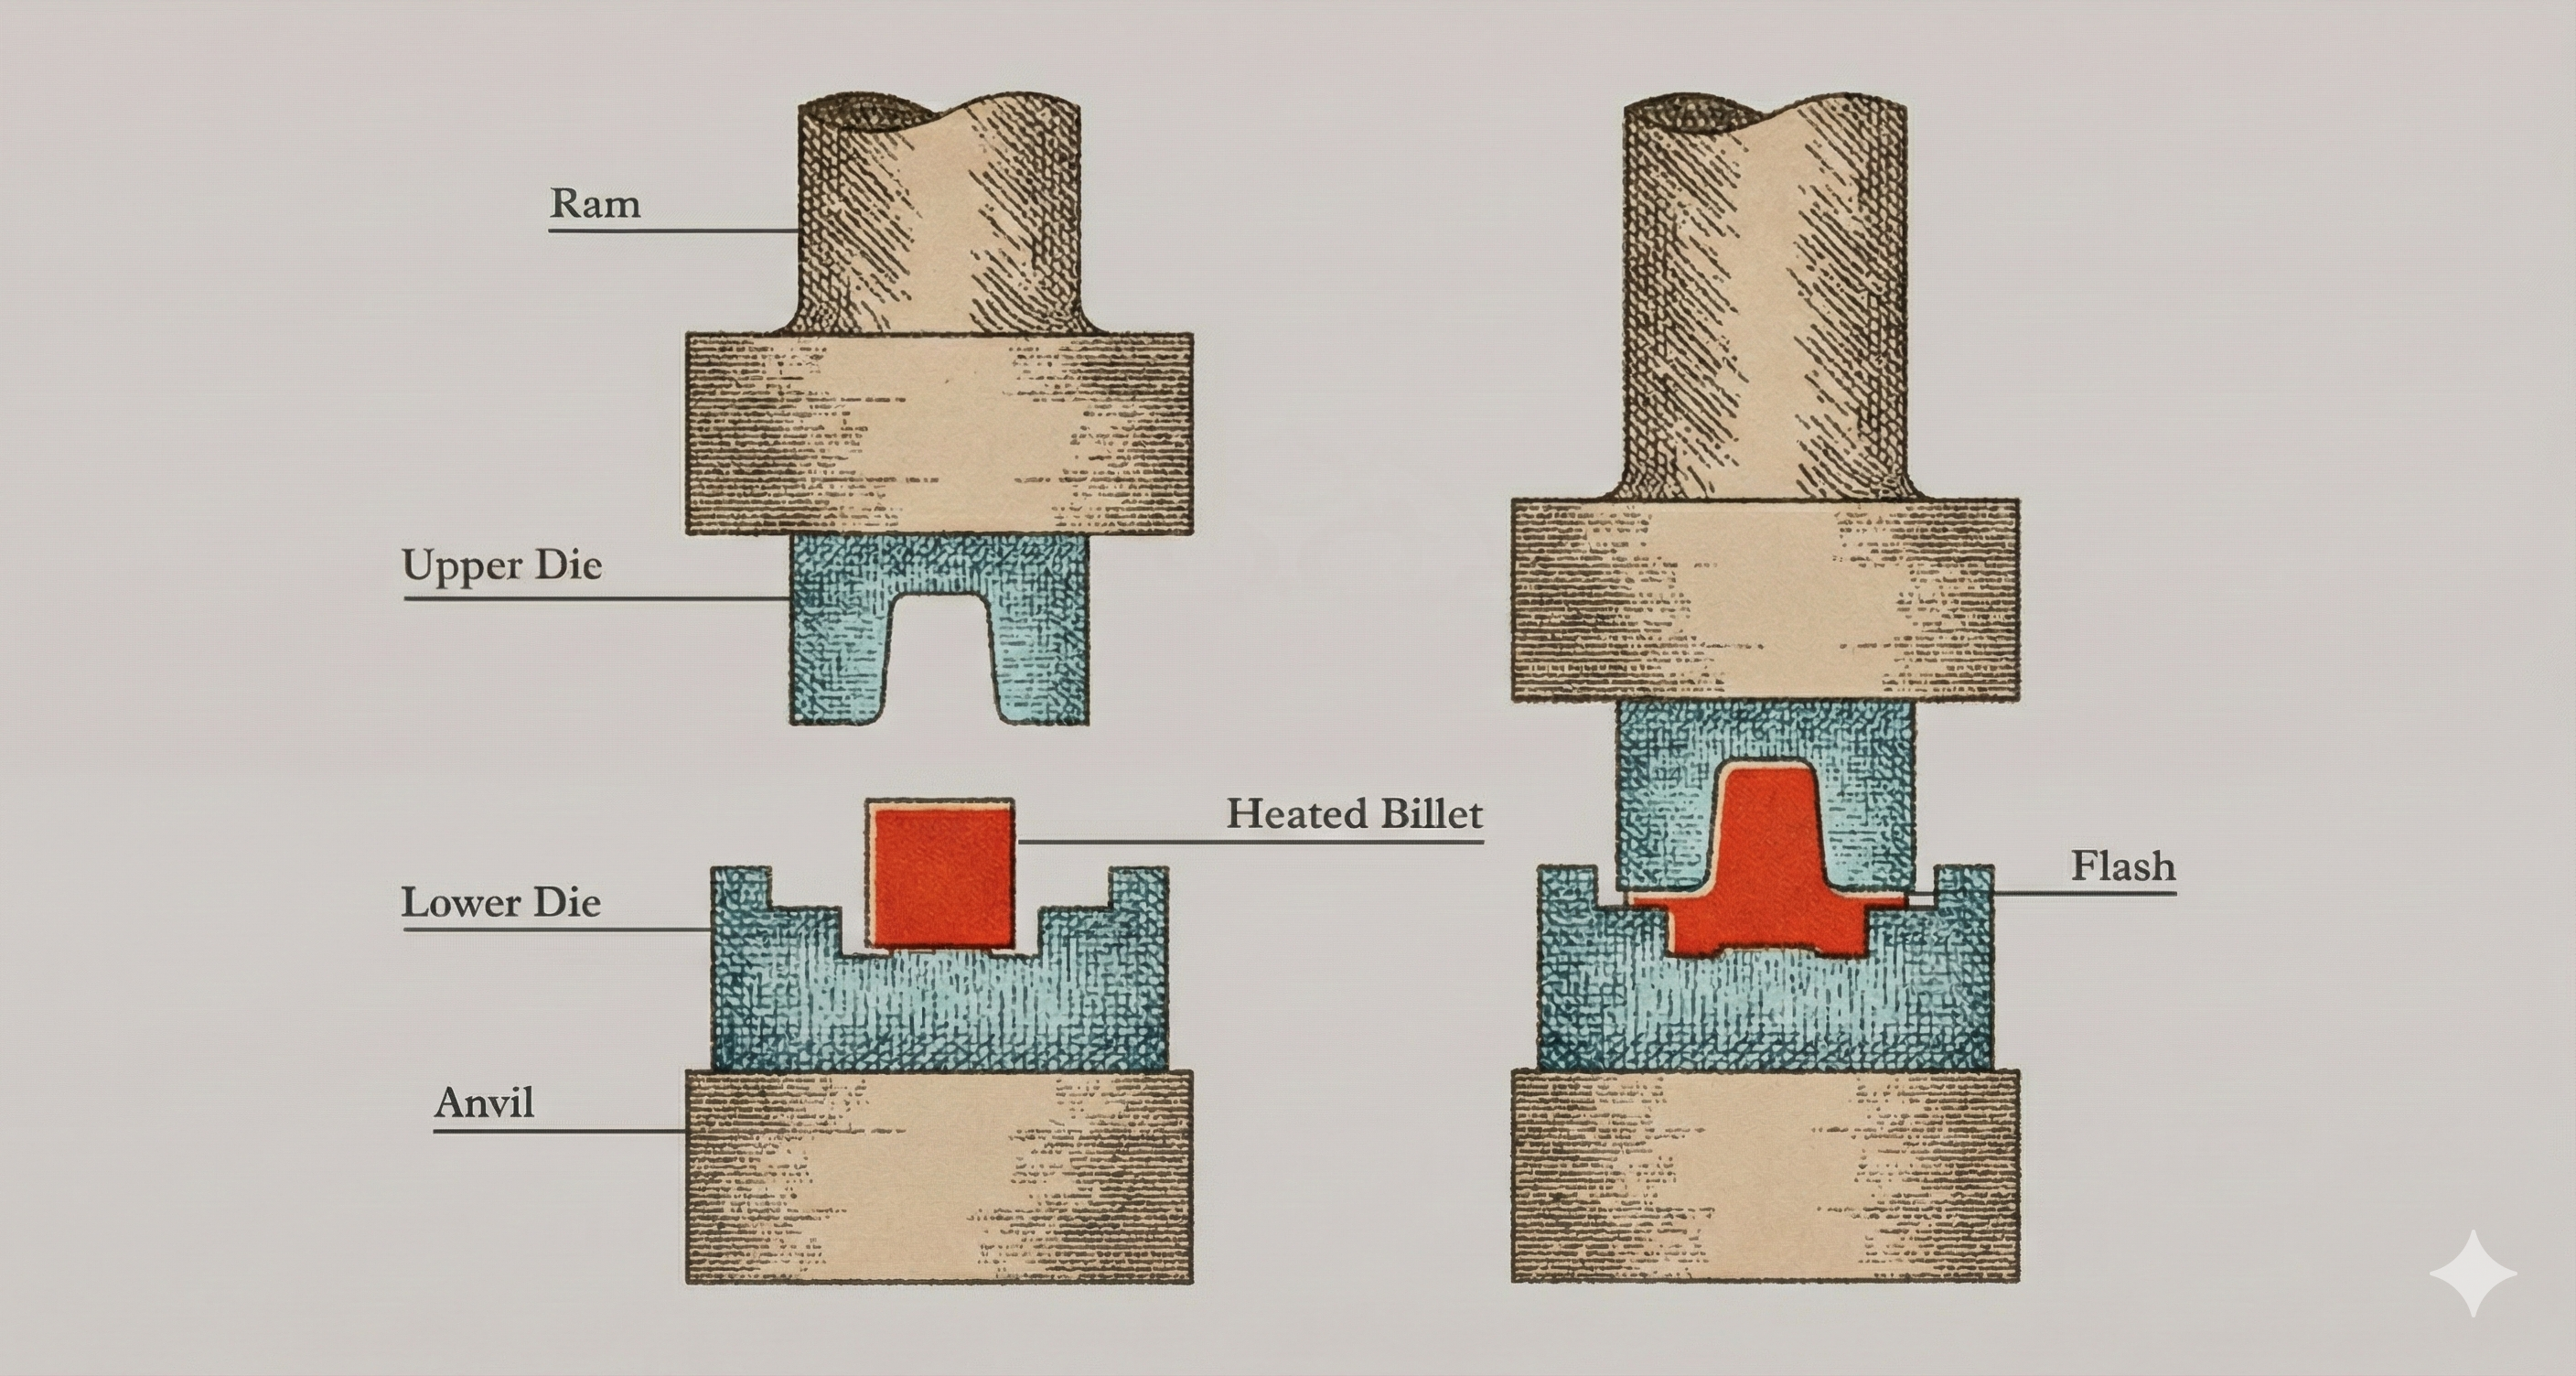
Forging:

How it works:
- Metal is heated to a high temperature and placed in a die
- A hammer or press is used to shape the metal by applying force
- The shaped metal is allowed to cool and is then finished
| Advantages | Disadvantages |
|---|---|
|
|
Uses: Tooling, automotive components, industrial machinery
Drop forging:
How it works:
- Metal is heated and placed in a die
- A hammer is dropped onto the metal to shape it
- The part is then cooled and removed
| Advantages | Disadvantages |
|---|---|
|
|
Uses: Automotive parts, hand tools, railway components
Bending:
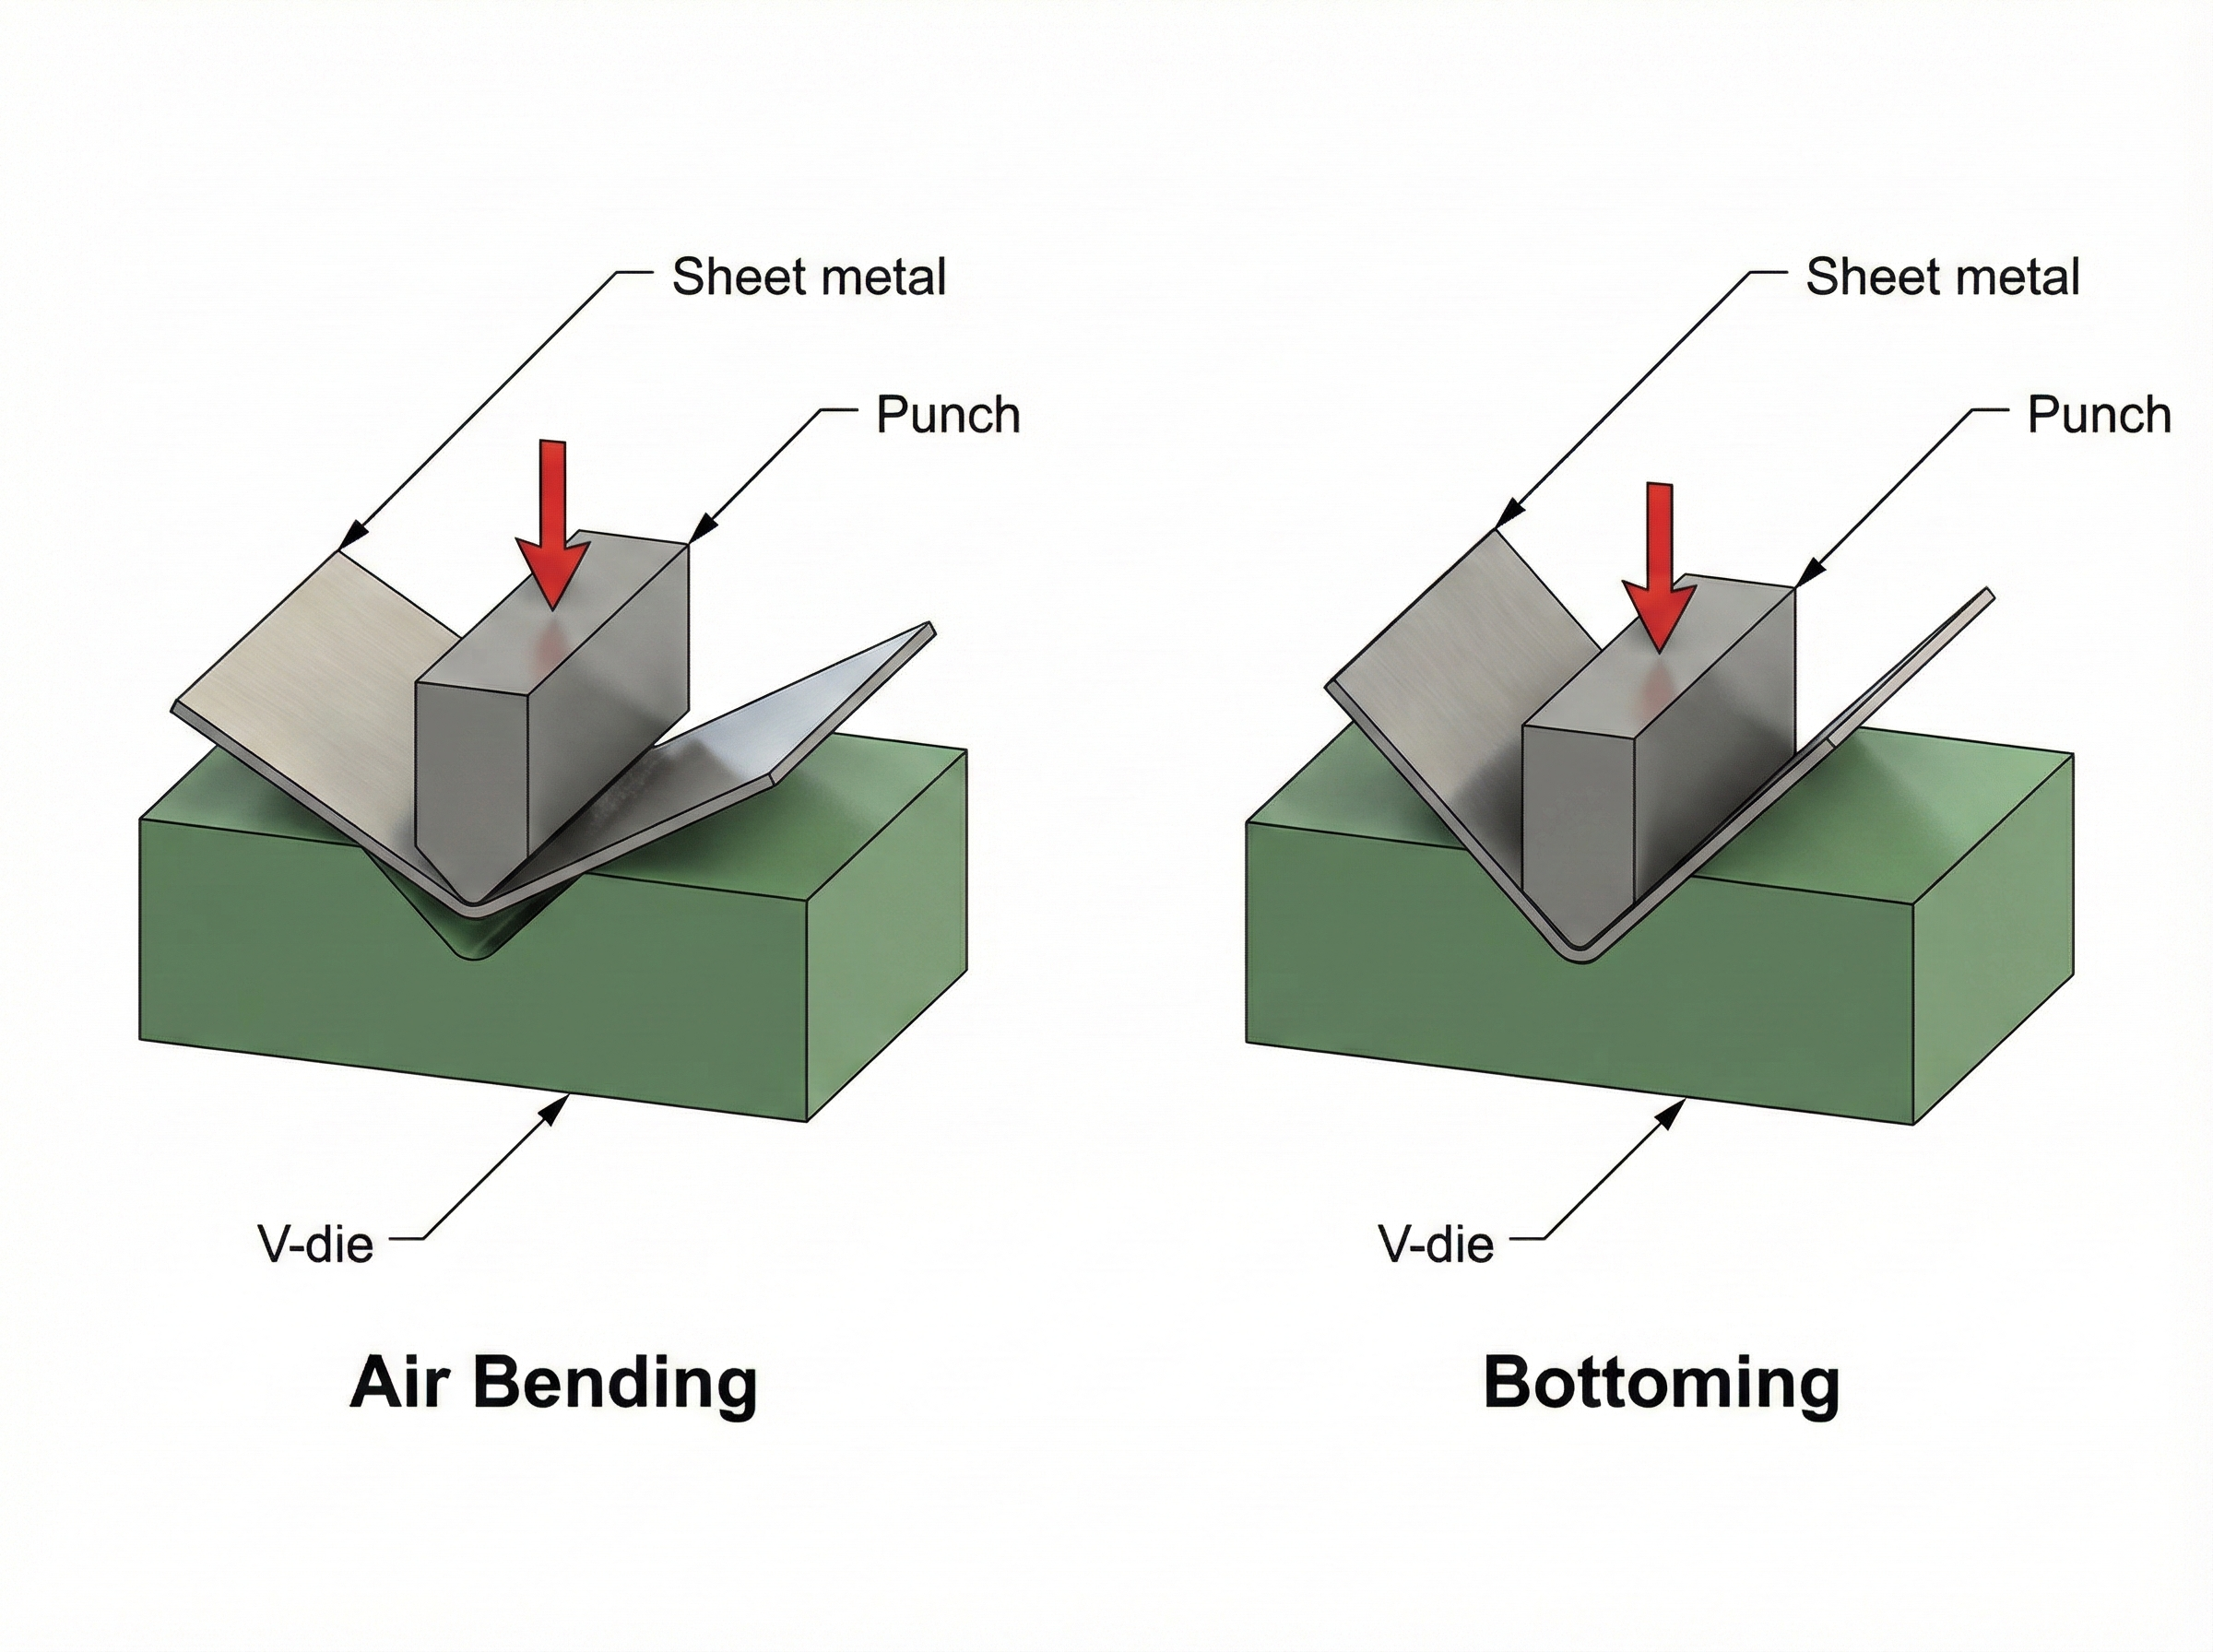
How it works:
- A metal sheet or bar is placed in a die or between rollers
- A force is applied to bend the metal into the desired shape
- The bent part is then removed and finished
| Advantages | Disadvantages |
|---|---|
|
|
Uses: Brackets, structural supports, metal furniture
Rolling:
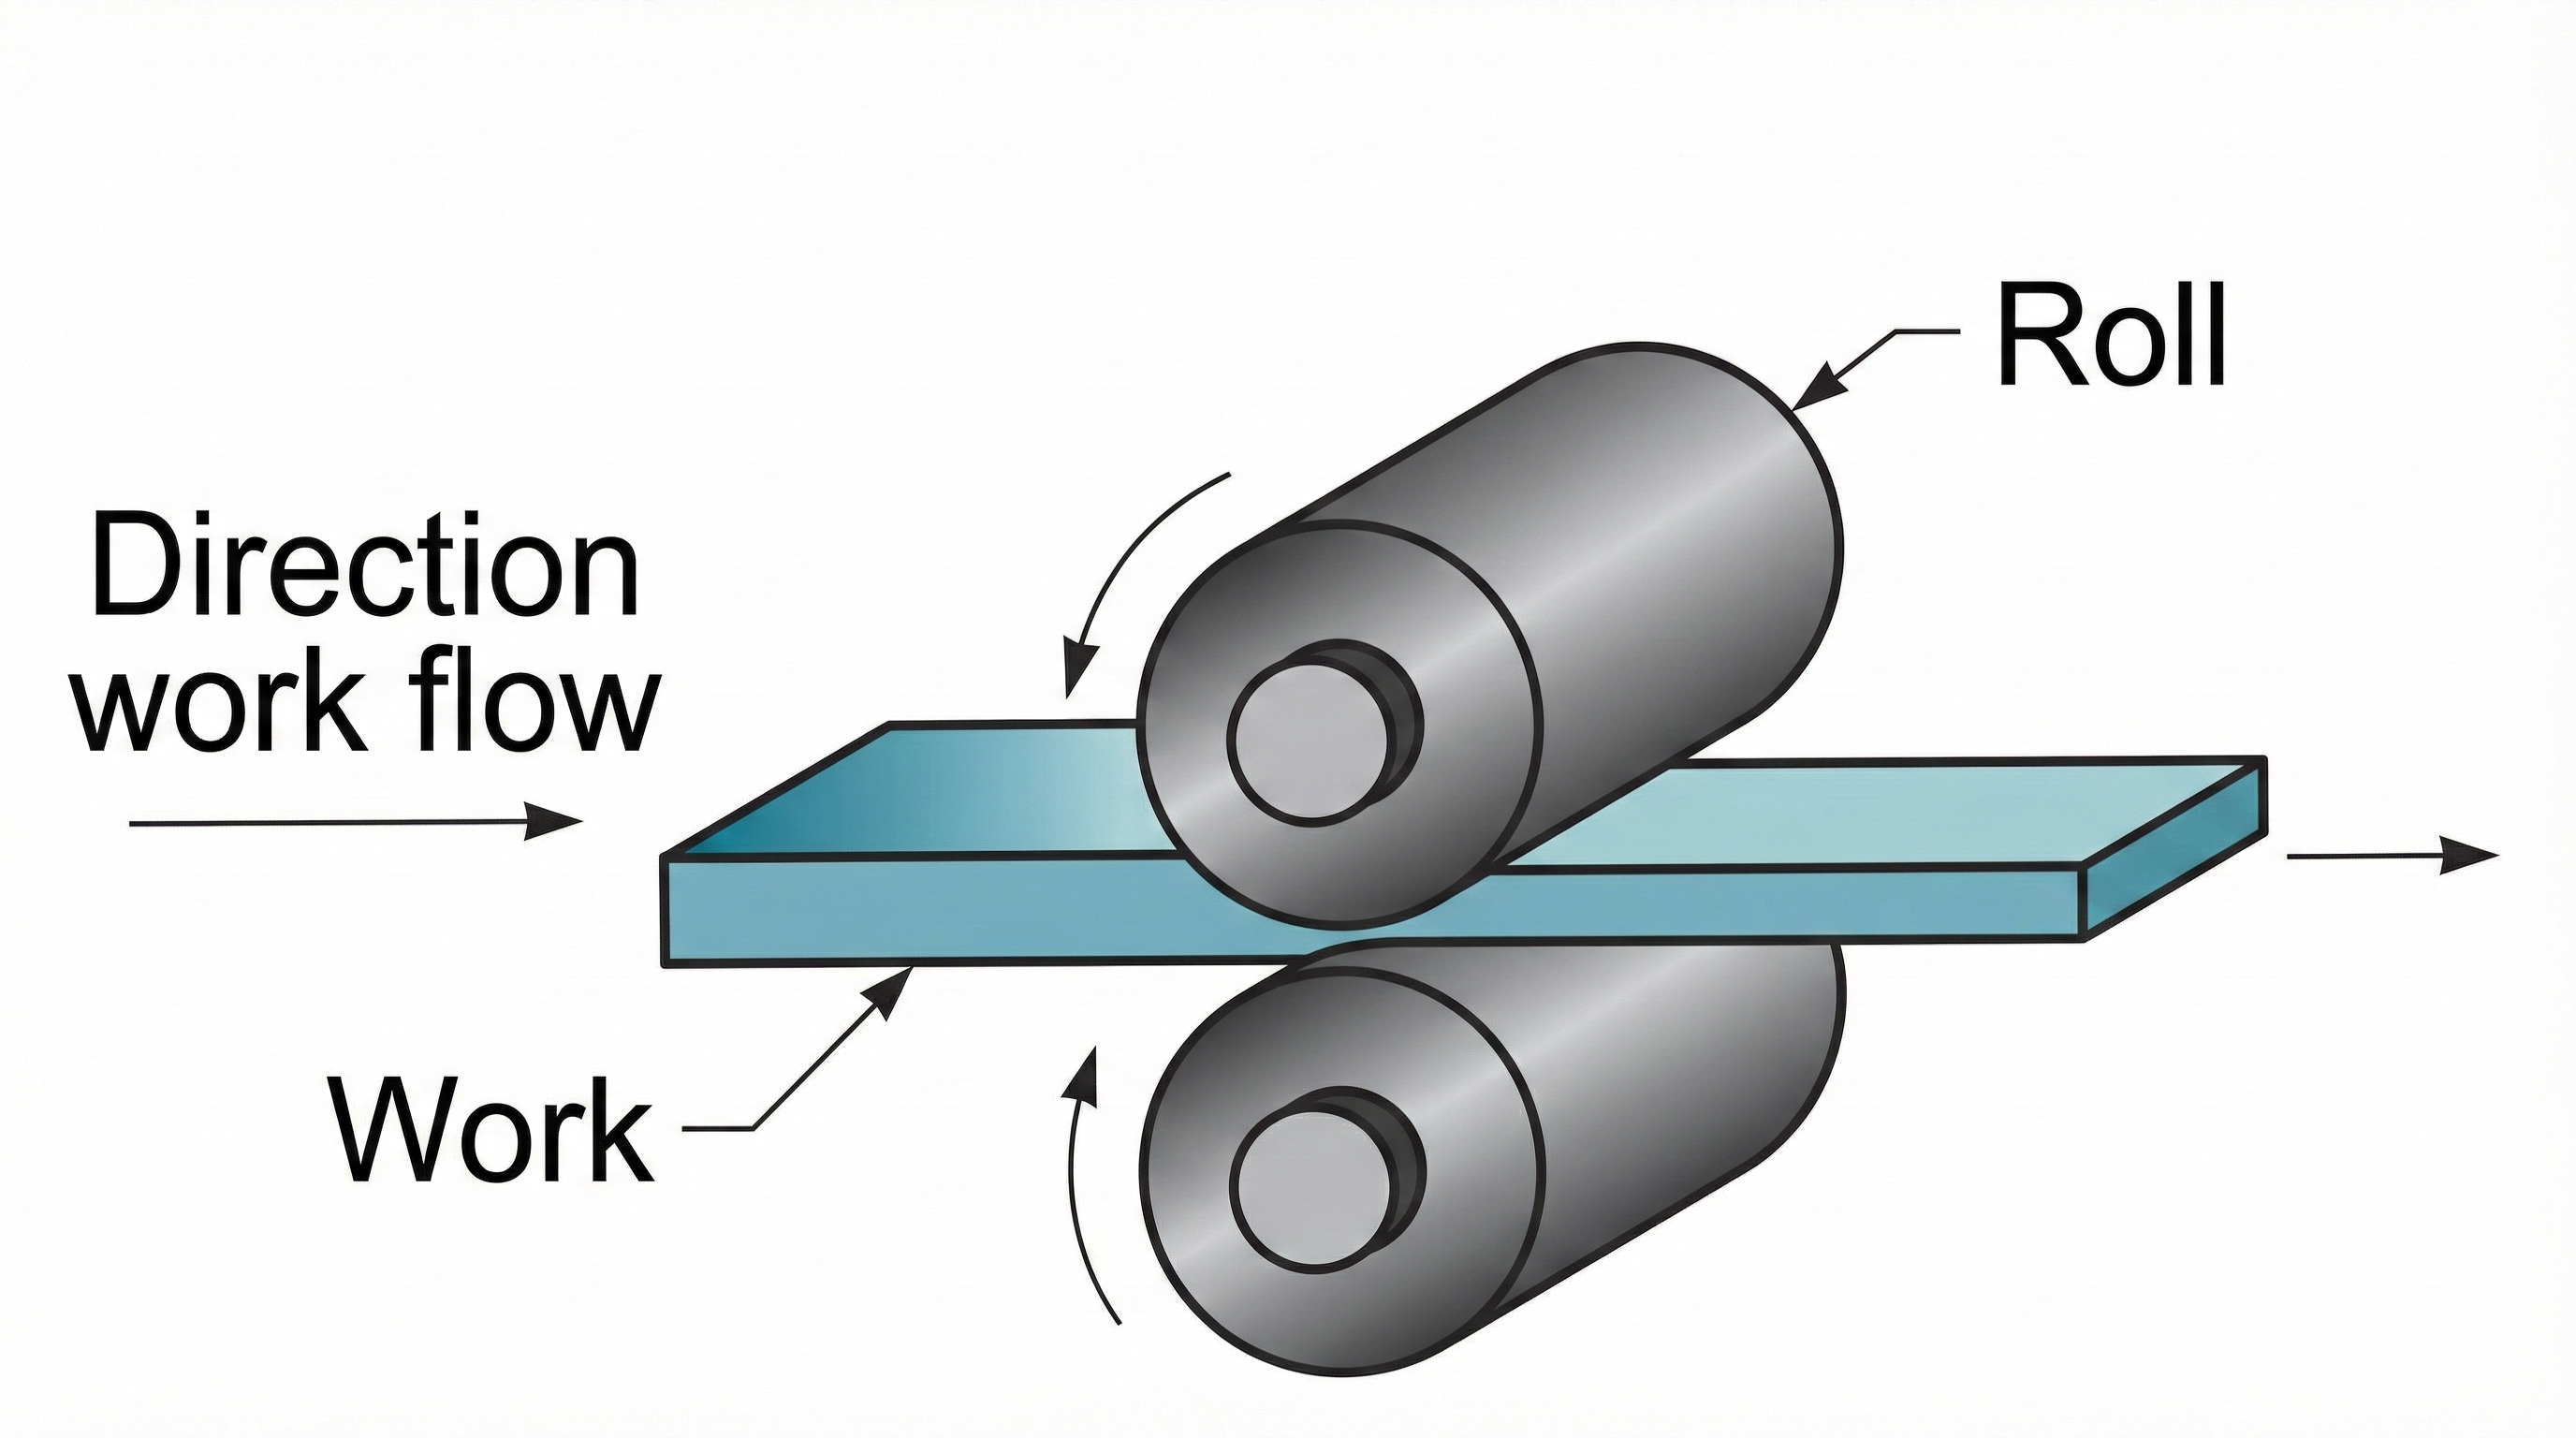
How it works:
- Metal is passed between two rotating rolls to reduce its thickness
- The rolls can be adjusted to create the desired thickness
- The metal is then finished and cut into sheets, plates, or coils
| Advantages | Disadvantages |
|---|---|
|
|
Uses: Steel sheets, pipes, structural beams
Sand casting:
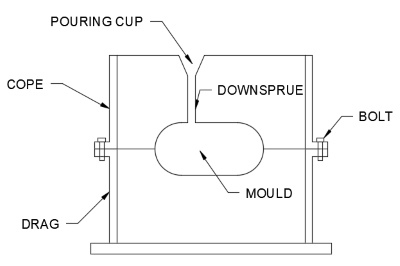
How it works:
- Make a mould in the sand using two half moulds called the cope and drag and make sure the corners are rounded or tapered
- Place the pattern and sprue in the mould and pack sand around them before removing the pattern
- Cut gates and channels in the sand and fix the cope and drag together using nuts and bolts
- Pour molten metal into the mould and allow it to cool before breaking the sand mould
- Remove the casting and apply finishing processes if needed
| Advantages | Disadvantages |
|---|---|
|
|
Uses: Engine blocks, garden furniture, caterpillar tracks
Die casting:
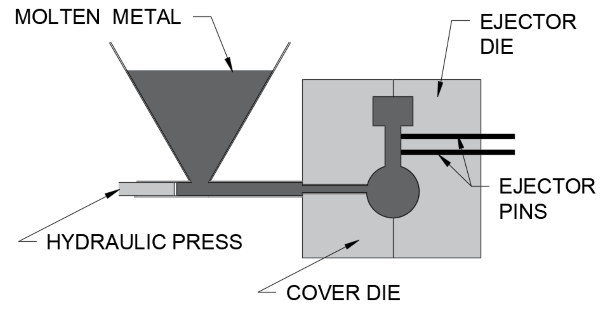
How it works:
- Create and lubricate the mould
- Once mould has been created, molten metal is shot under high pressure into the die
- When the die is full, the pressure is maintained until the metal has solidified and cooled
- The mould is then removed and finishes are applied
| Advantages | Disadvantages |
|---|---|
|
|
Uses: Taps, model cars
Investment casting:
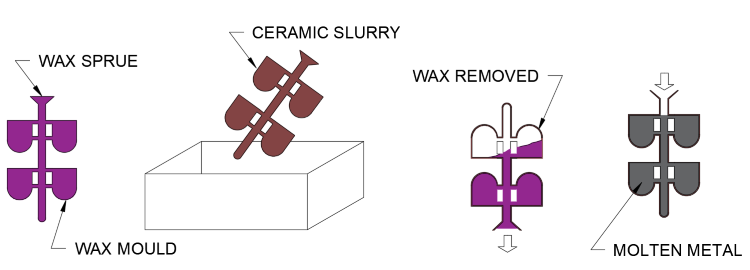
How it works:
- Cold wax mould made of desired shape
- Wax mould attached to sprue before being dipped into liquid ceramic/stucco
- Then heated to remove wax and set ceramic
- Molten metal is then poured into the cermaic mould and allowed to set
- Ceramic shell is then broken off revealing product
| Advantages | Disadvantages |
|---|---|
|
|
Uses: Turbine blades, gears, machine parts
Low temperature casting (pewter):
How it works:
- Prepare a mould using sand or a permanent material
- Heat pewter alloy to a low temperature (typically around 230°C)
- Pour the molten pewter into the mould
- Allow the metal to cool and solidify
- Remove the casting and apply finishing touches
| Advantages | Disadvantages |
|---|---|
|
|
Uses: Jewelry, small decorative items, figurines
Joining methods
MIG welding:
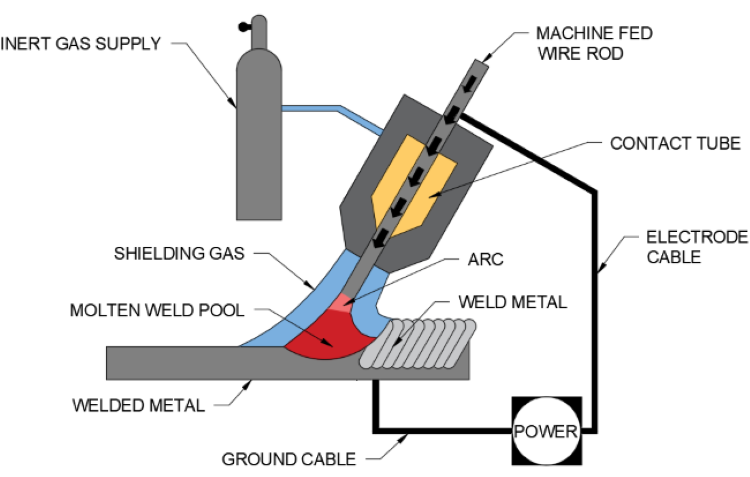
How it works:
- Used to weld thin metals
- MIG welding uses an electric arc to create heat
- Carbon dioxide/argon is used to form a flux shield to protect the weld area from oxidation
- Then an electrode wire (of the same material) is melted to fill the gap for the weld
| Advantages | Disadvantages |
|---|---|
|
|
Uses: Cars, bike frames, metal barriers
TIG welding:

How it works:
- Used to weld thin to medium thickness metals, often for high-precision work
- TIG welding uses a non-consumable tungsten electrode to create heat for the weld
- An inert gas (argon or helium) is used to protect the weld area from oxidation
- The filler material (if needed) is manually fed into the weld pool
- The welder controls the heat and filler material to ensure a clean and precise weld
| Advantages | Disadvantages |
|---|---|
|
|
Uses: Aerospace, stainless steel welding, pipe welding, artistic metalwork
Key differences between MIG and TIG welding:
- MIG welding uses a consumable electrode wire, while TIG welding uses a non-consumable tungsten electrode and manual filler addition.
- MIG welding is faster and easier for beginners, while TIG welding provides more control and precision but is slower.
- MIG welding is better suited for thicker materials and faster production, while TIG welding is ideal for thinner materials and more detailed work.
- TIG welding offers cleaner welds with no spatter, whereas MIG welding can produce more spatter, though it is quicker.
Spot welding:
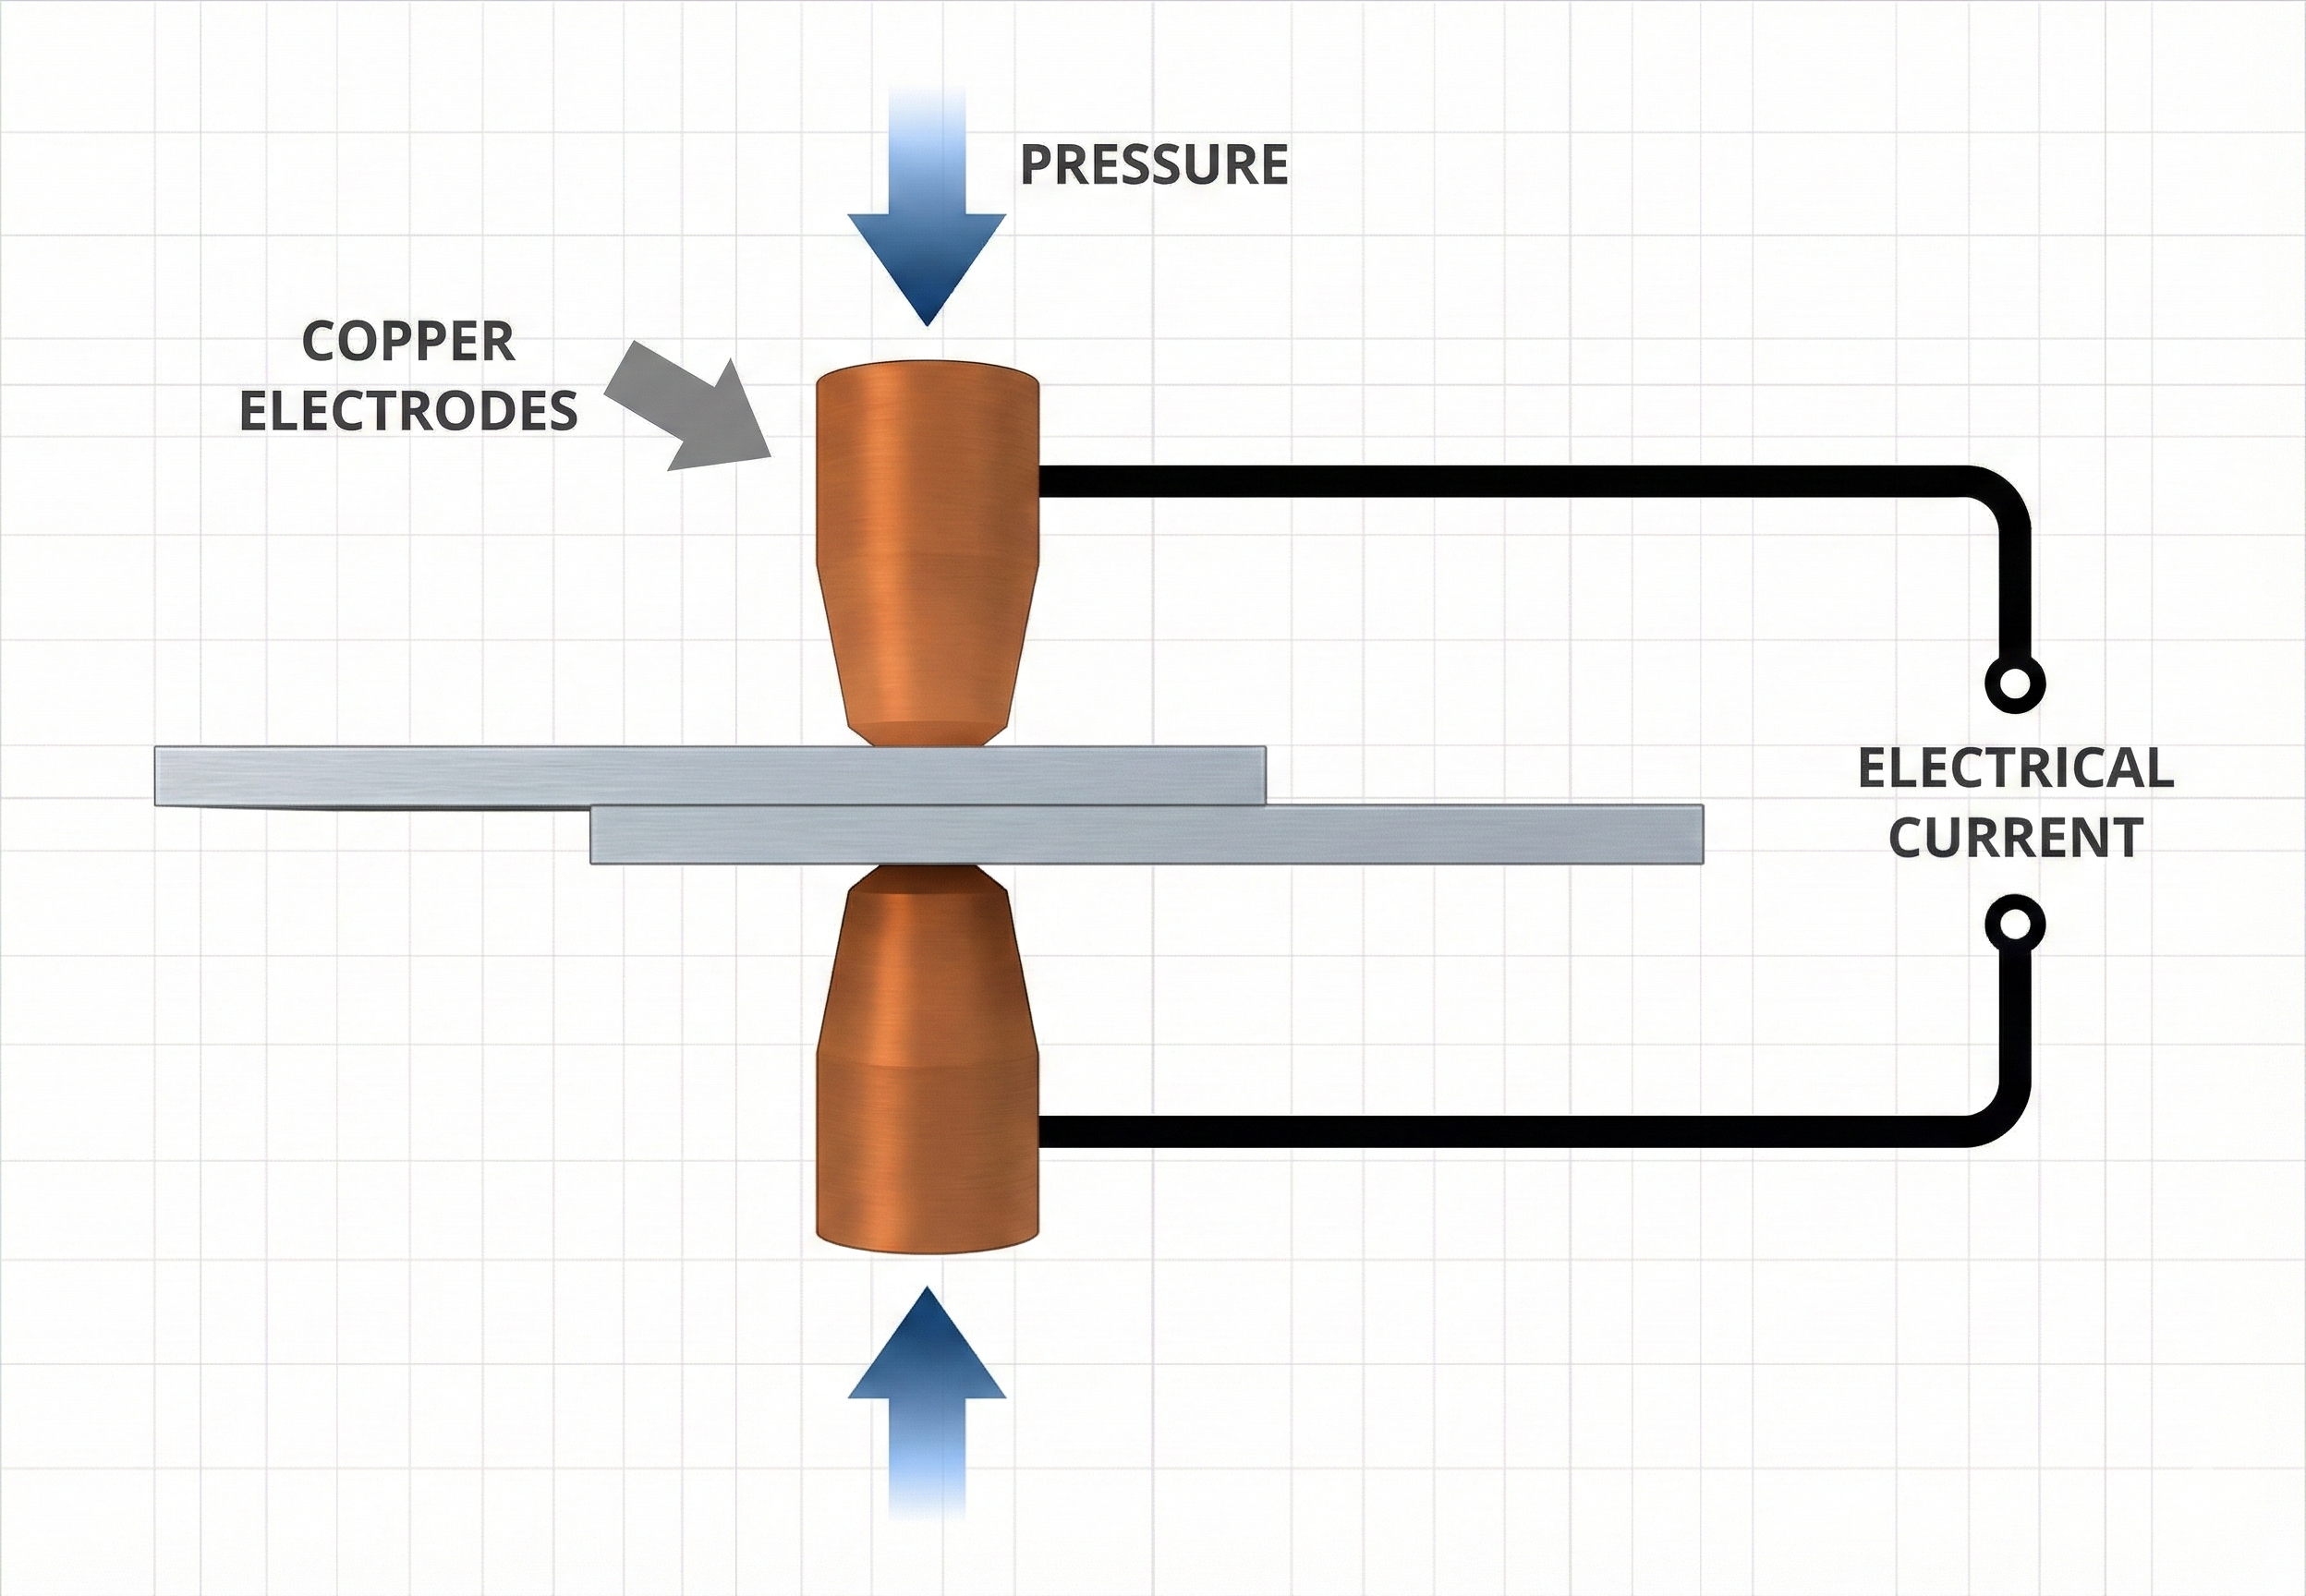
How it works:
- Spot welding uses two copper electrodes to apply pressure and heat to the material
- The materials to be welded are placed between the electrodes, and an electric current is passed through them
- The electrical resistance at the interface causes localized heating, forming a weld at the contact point
- Heat and pressure are maintained for a short period, allowing the metal to fuse at the spot
- No filler material is used, and the weld is typically small and concentrated at the point of contact
| Advantages | Disadvantages |
|---|---|
|
|
Uses: Automotive industries, electronics, household appliances, metal sheet
fabrication
Oxy acetylene welding:
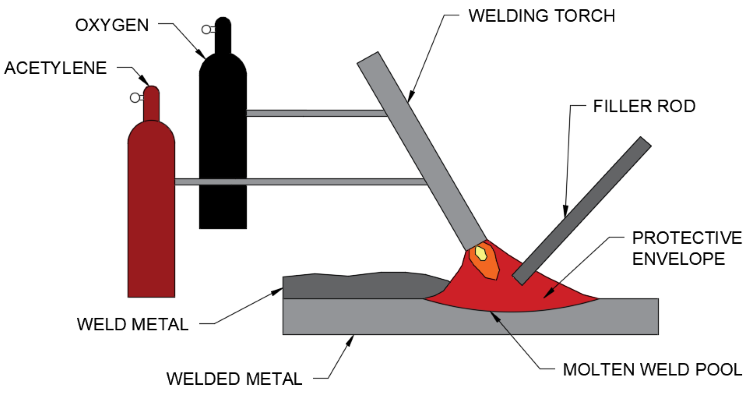
How it works:
- Used to weld low carbon steel
- The metal is prepared by creating a v shaped joint between to two metals
- An oxygen and acetylene blow torch then heats the area
- This creates a melt pool, this melt pool mixed with a steel filler rod creates the welded joint
| Advantages | Disadvantages |
|---|---|
|
|
Uses: General engineering
Hard soldering:
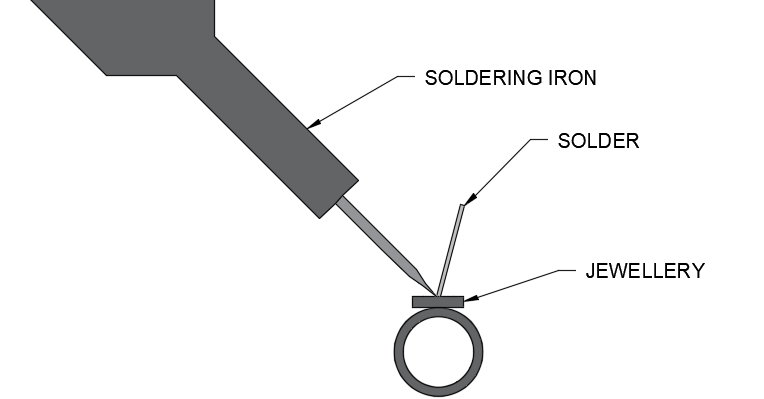
How it works:
- The two metals being joined is cleaned
- Then the two materials are held together using a former
- The metal is then heated up to the same temperature as the melting point of the solder
- The solder is then applied to the joint area
| Advantages | Disadvantages |
|---|---|
|
|
Uses: Jewellery, ornaments, silverware, model engines
Soft soldering:
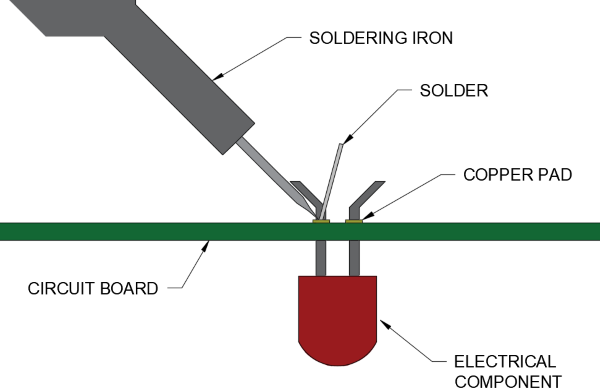
How it works:
- The two metals being joined is cleaned
- Then the two materials are held together using a former
- The metal is then heated up to the same temperature as the melting point of the solder
- The solder is then applied to the joint area
| Advantages | Disadvantages |
|---|---|
|
|
Uses: Electronics
Brazing:
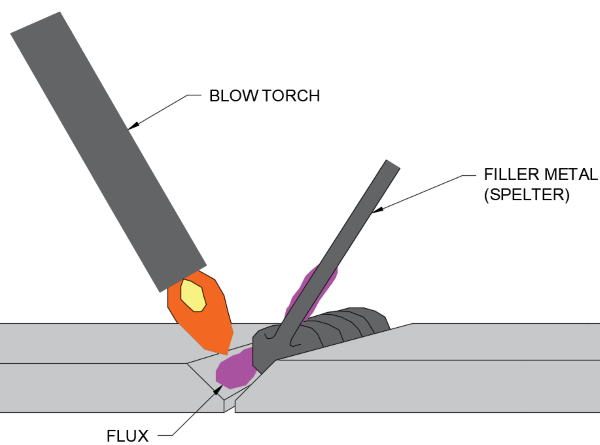
How it works:
- The two materials being joined are cleaned before welding
- Then the two materials are held together using a former
- Flux is applied to prevent the join area from oxidation
- A welding torch then heat the join area and a brazing rod is used to fill the joint area
| Advantages | Disadvantages |
|---|---|
|
|
Uses: General engineering, bicycle frame
Riveting:
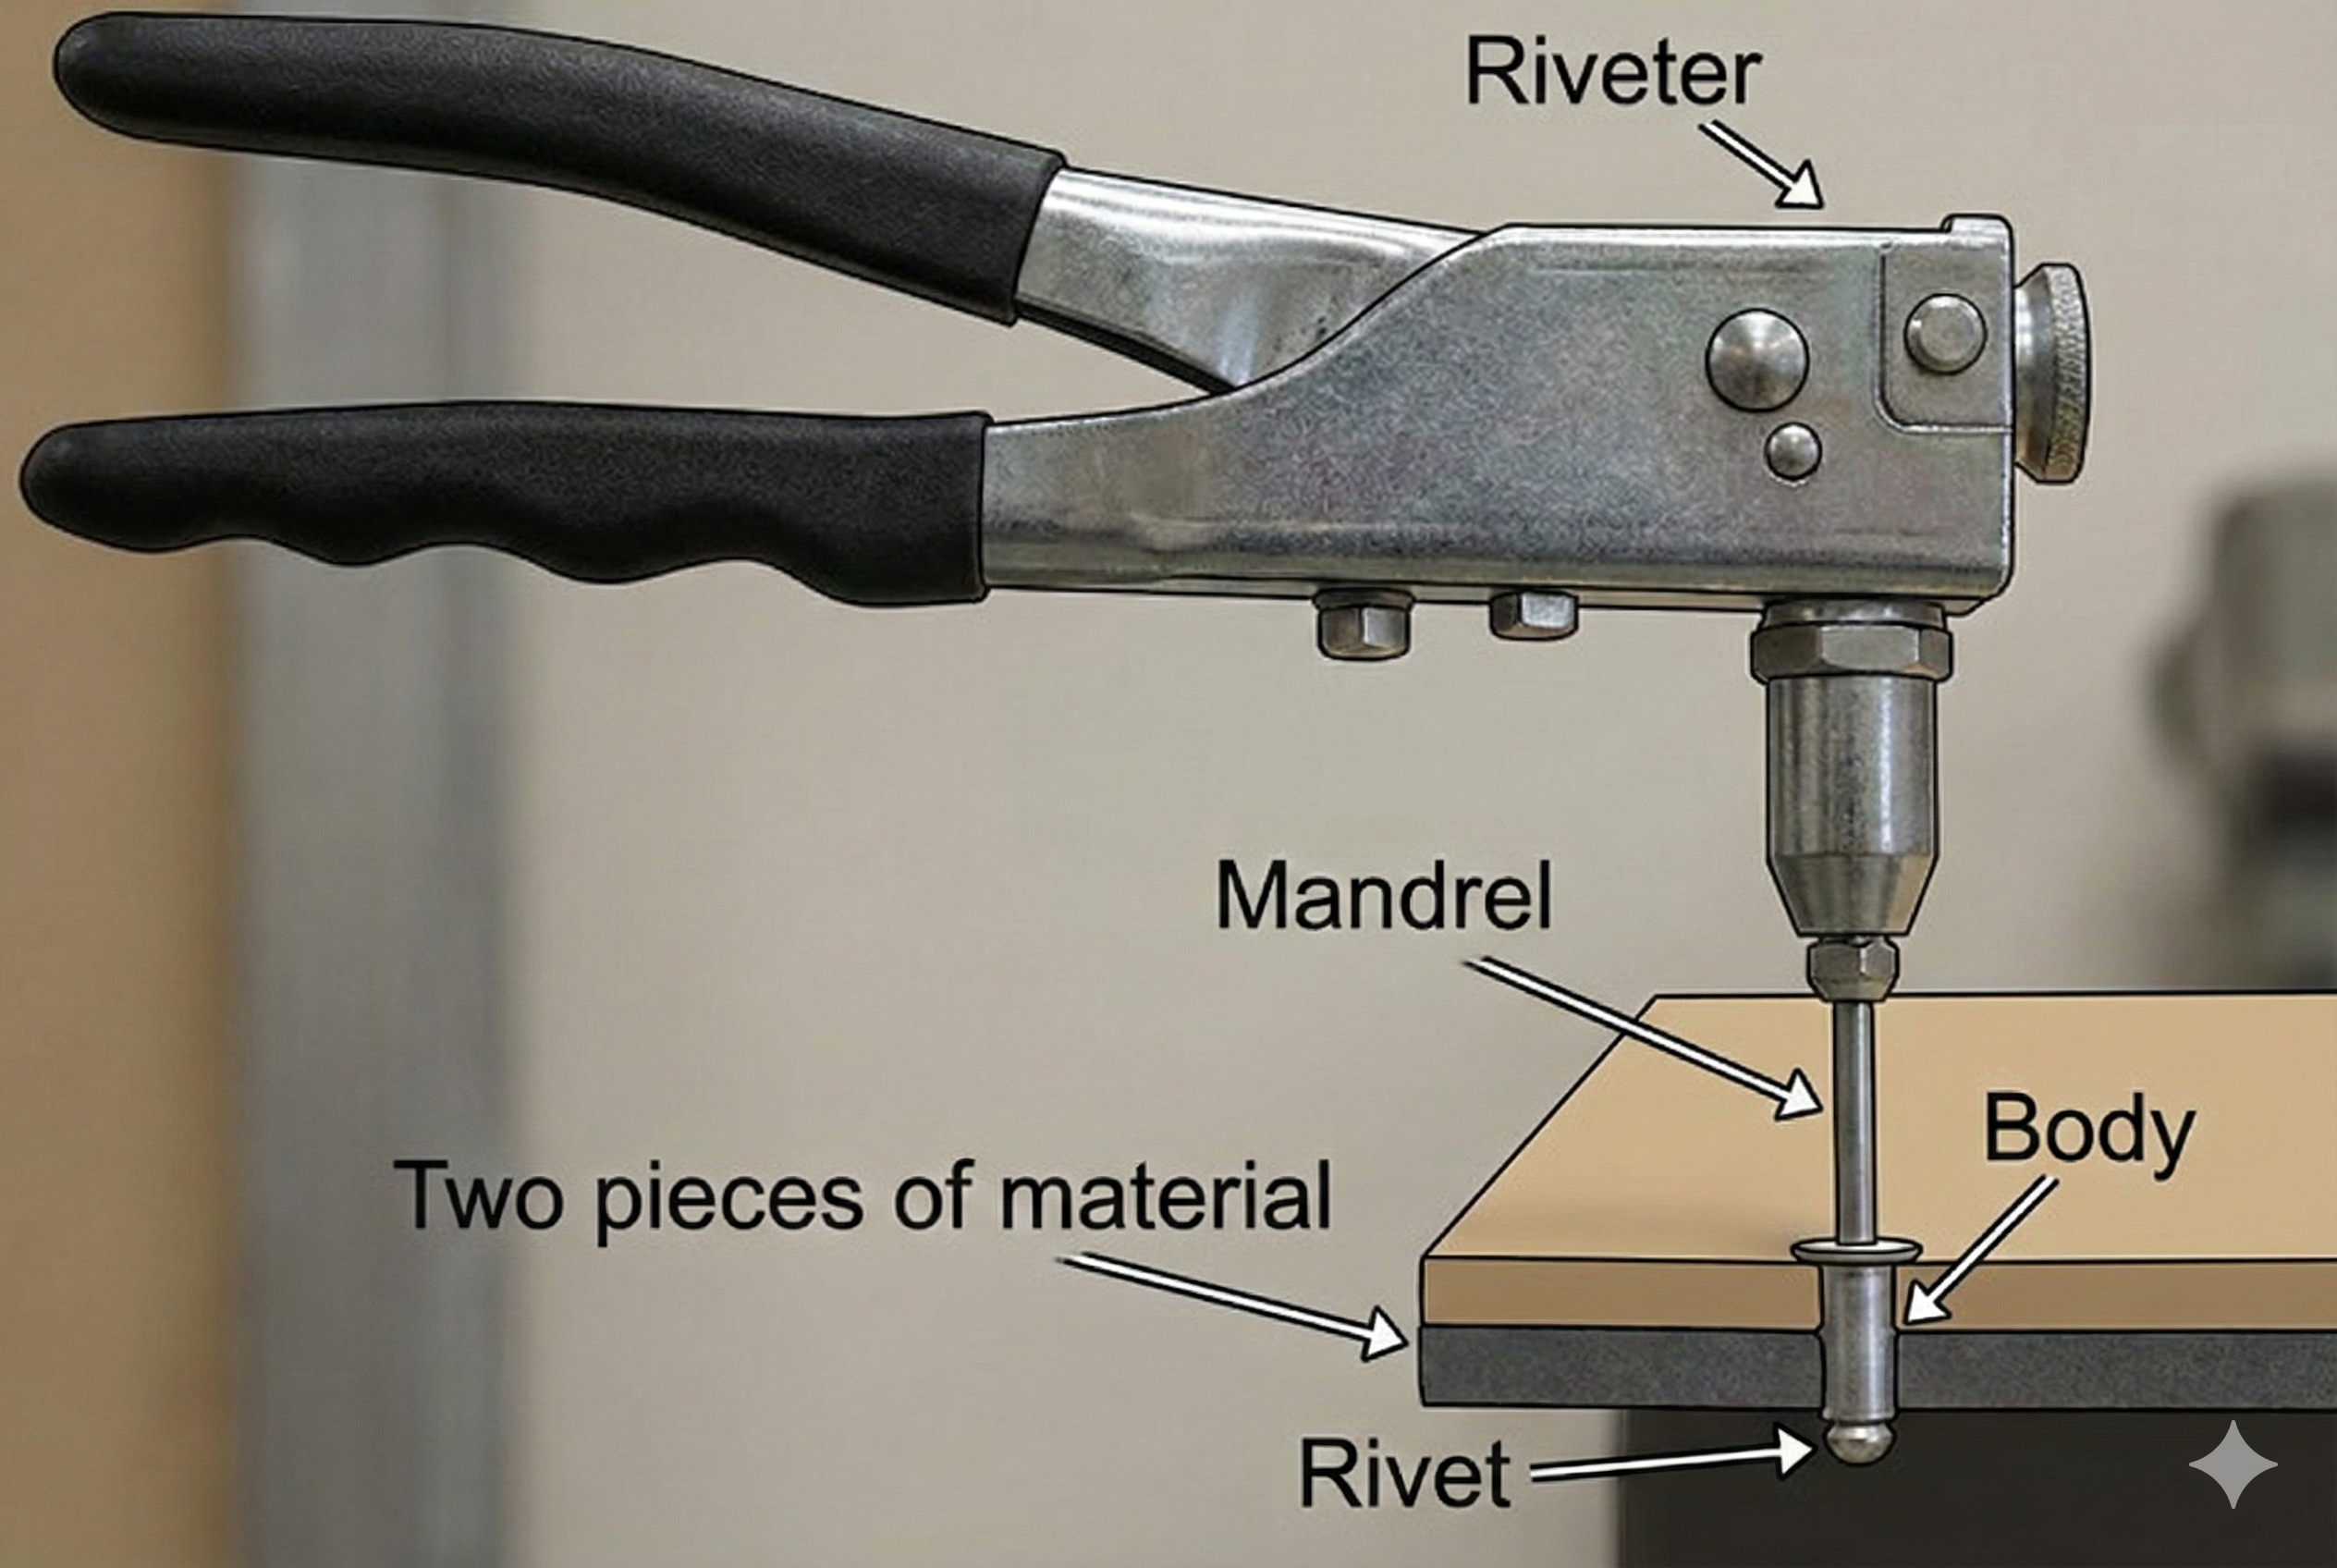
How it works:
- Riveting involves using a rivet (a short metal pin) to join two or more materials together
- The rivet is placed into a pre-drilled hole and the ends are deformed to hold the materials in place
- A hammer or machine is used to flatten one end of the rivet (the “tail”) against the surface of the material, creating a strong joint
- The process may be performed manually or with automatic riveting machines
- Once the rivet is deformed, it holds the materials tightly together, forming a secure bond
| Advantages | Disadvantages |
|---|---|
|
|
Uses: Aerospace, structural steel, sheet metal work, automotive, construction
Temporary Joining Methods and Fasteners:
Self-tapping screws:
- These screws have a pointed tip that allows them to cut into the material, creating their own thread for a secure hold without the need for a pre-drilled hole.
- Used primarily in sheet metal, plastic, and wood.
Machine screws:
- Machine screws are typically used with nuts or threaded holes to fasten components together.
- They are versatile and available in different sizes, providing a strong, secure connection.
Nuts and bolts:
- Consist of a bolt (a threaded fastener) and a nut (a threaded component) that are used together to clamp materials securely.
- This method allows for easy disassembly and reassembly, making it ideal for temporary or adjustable connections.
Uses: Furniture assembly, machinery, automotive repairs, electronics, construction
Wasting processes
Vertical milling:
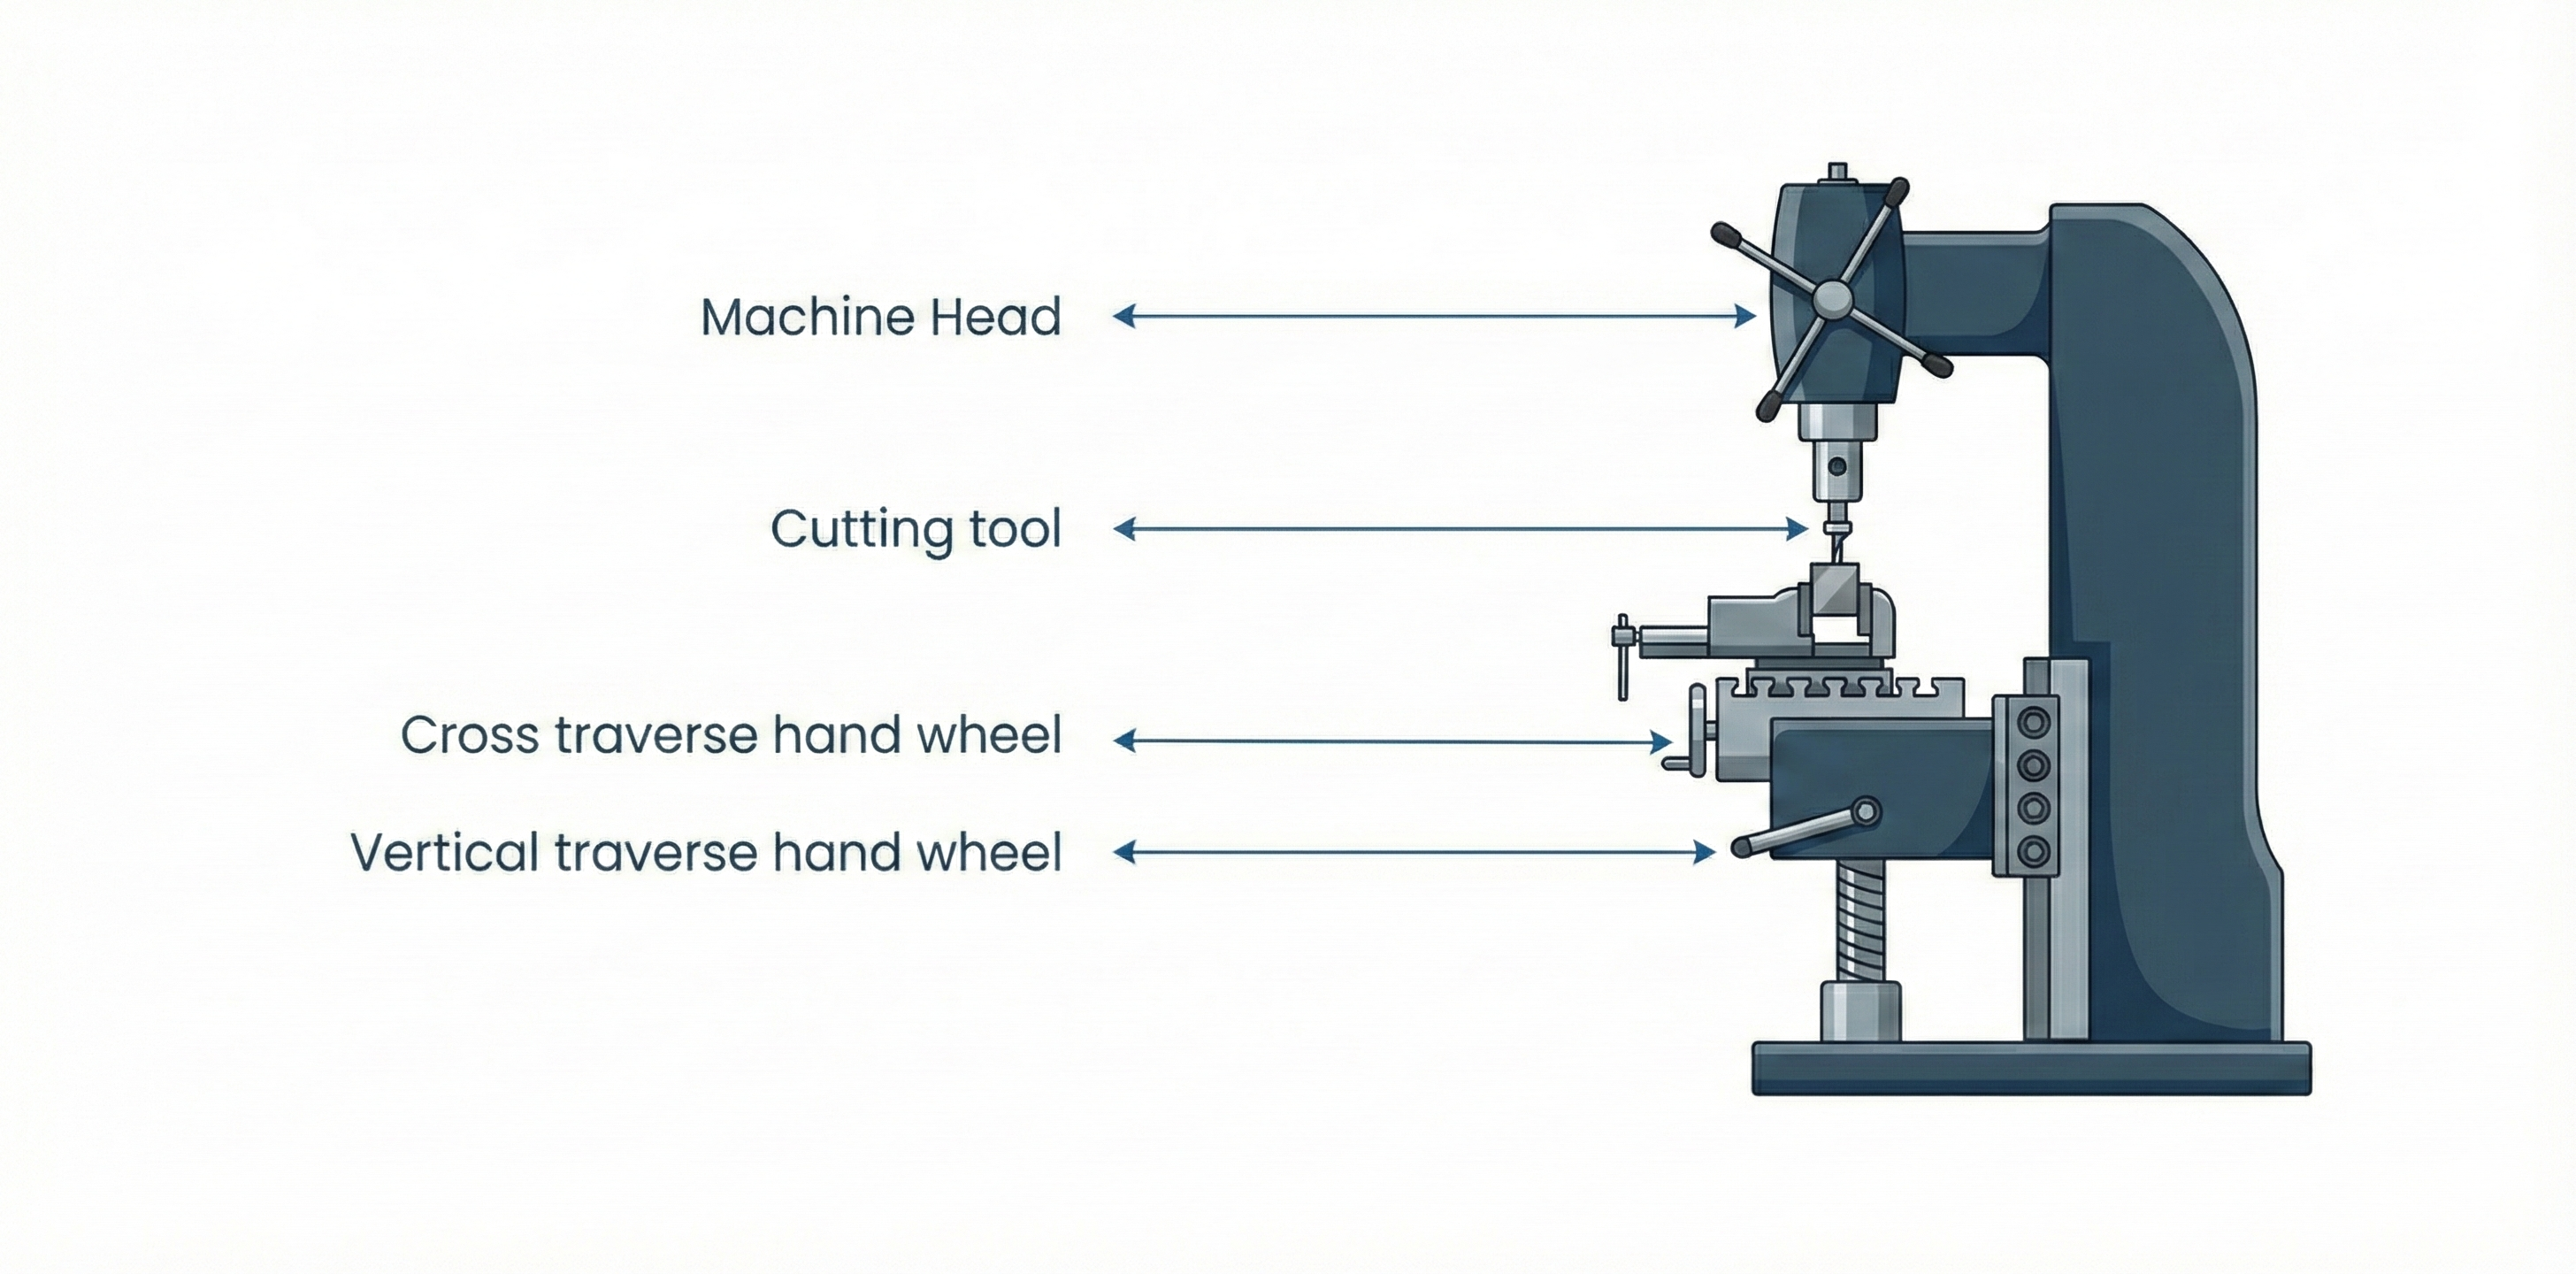
How it works:
- Material is clamped into place
- Cutter is selected and RPM is chosen
- The material always remains stationary while the machines cutting tool rotates
- As the cutting moves, it presses against the workpiece and shapes the material
| Advantages | Disadvantages |
|---|---|
|
|
Uses: Cutting gears, produce slots, drilling
Horizontal milling:
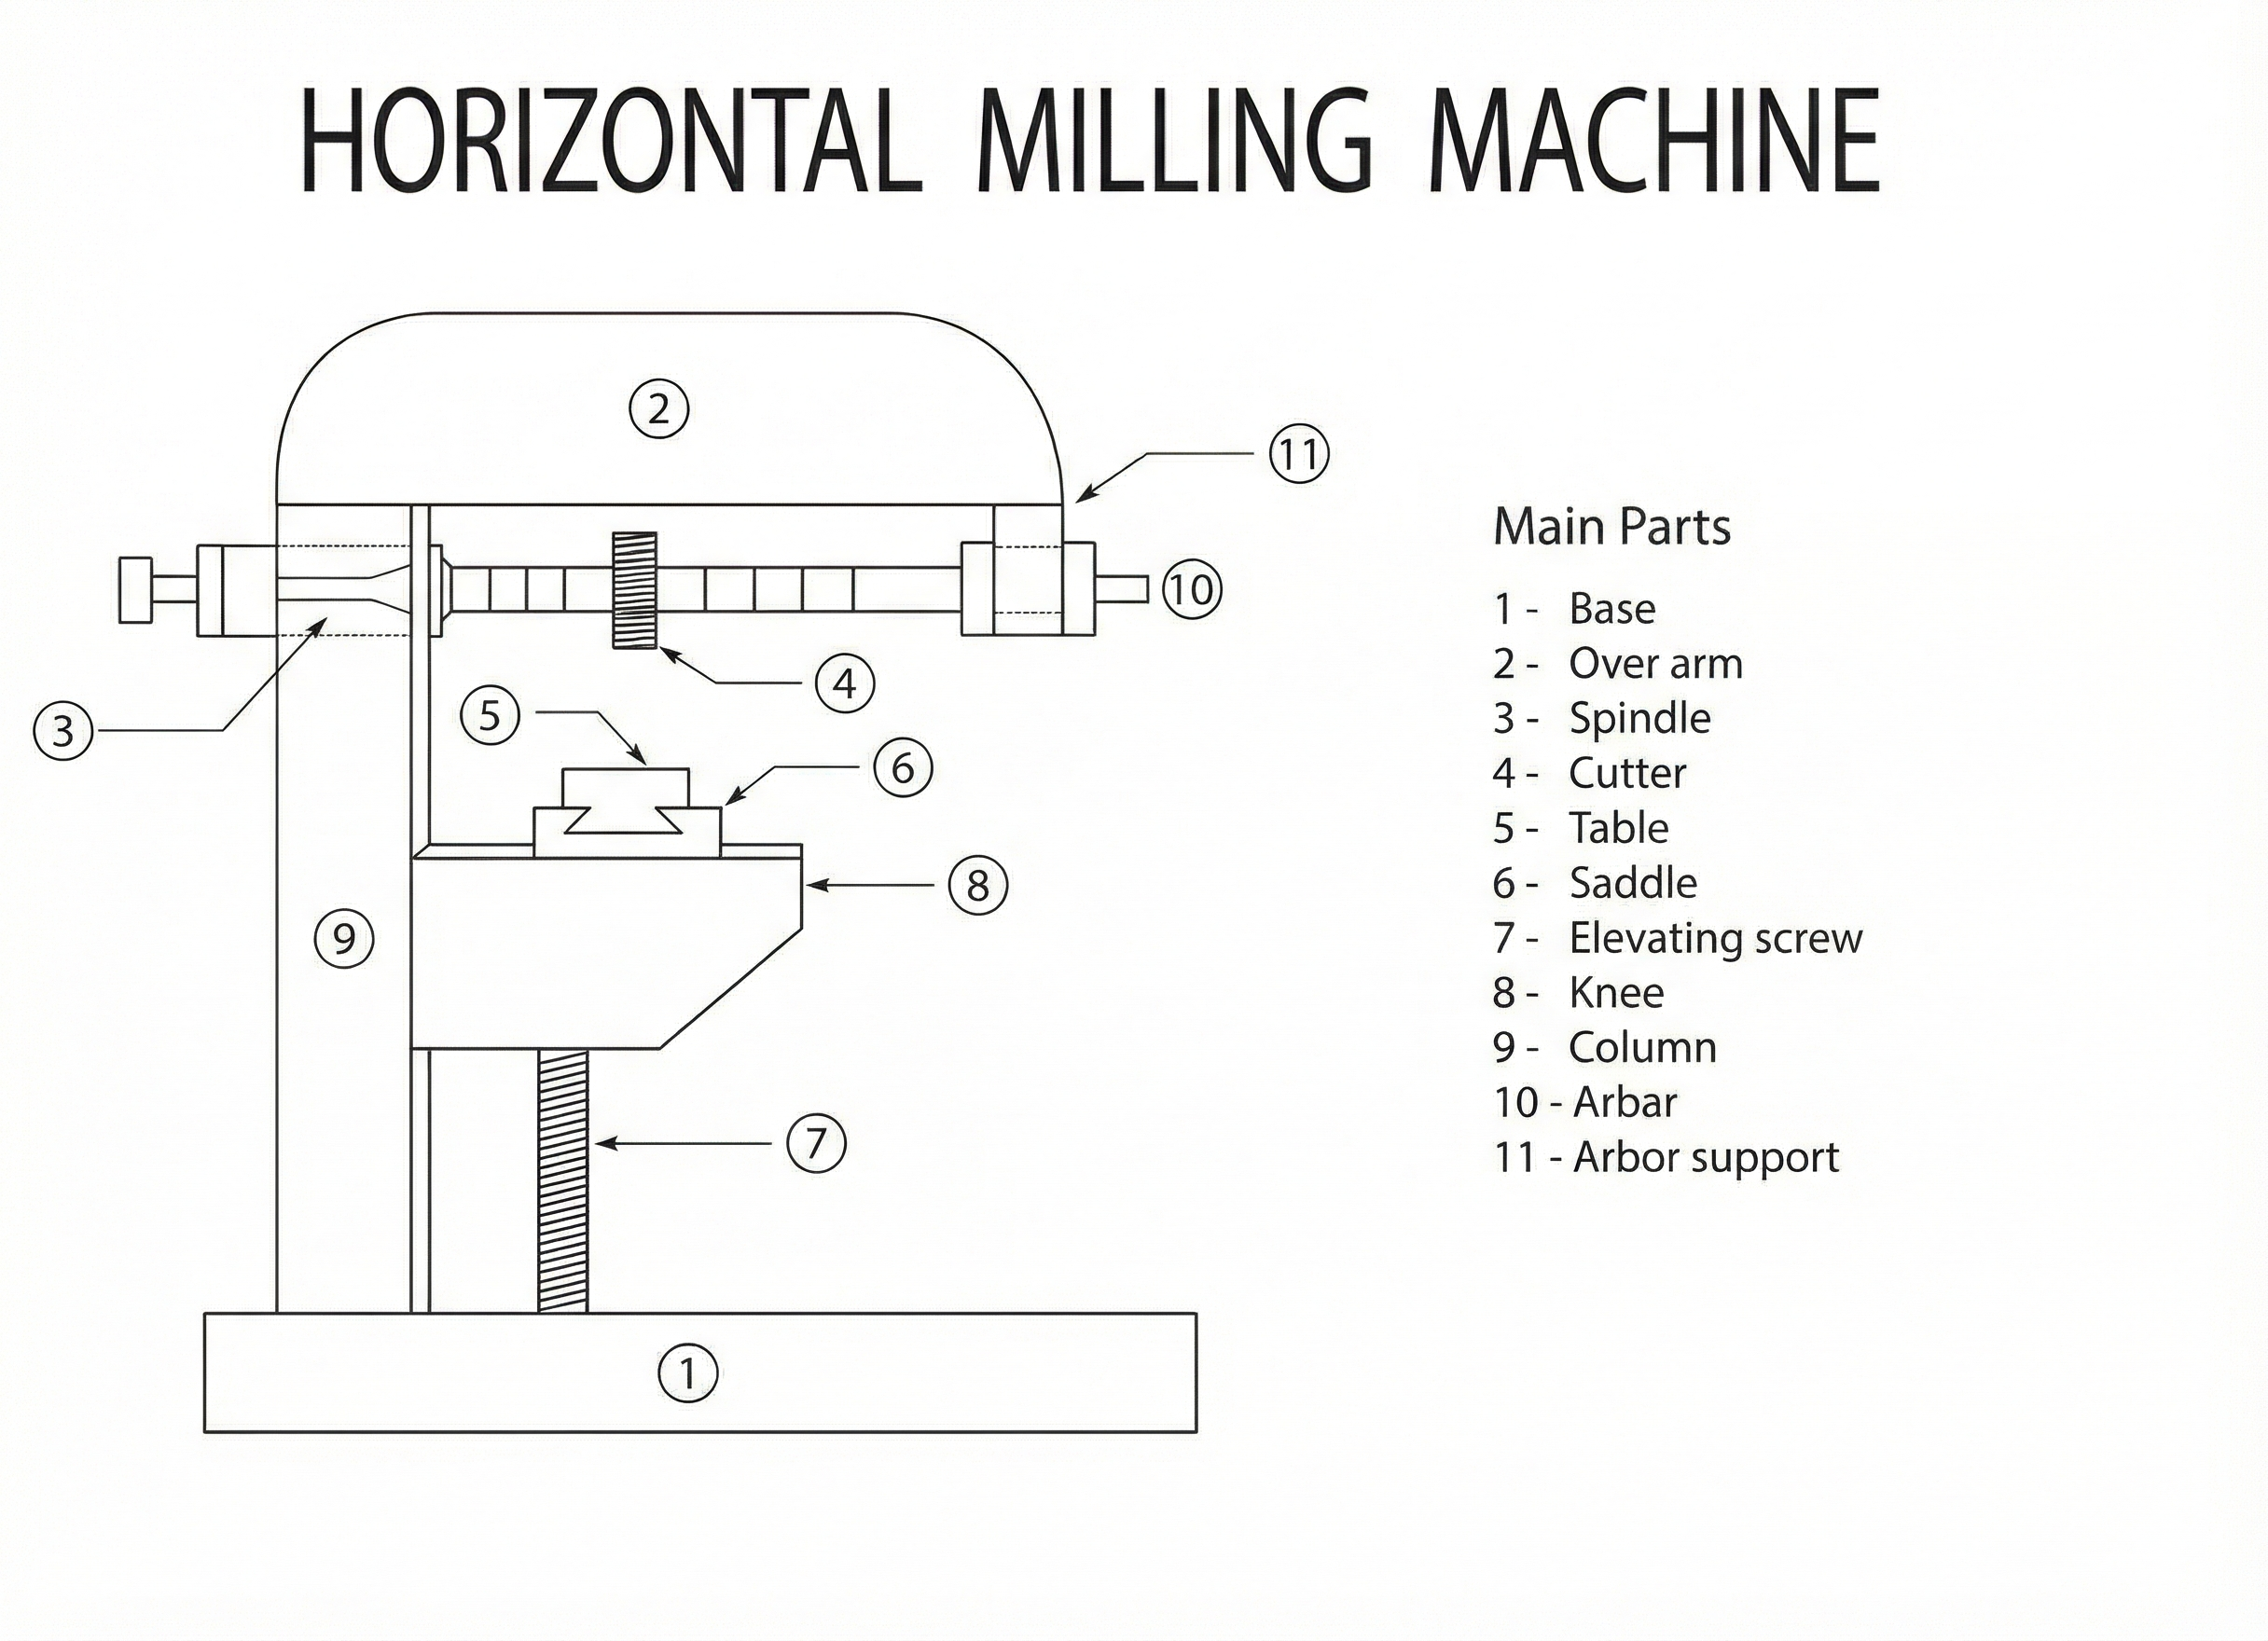
How it works:
- Material is clamped into place
- Cutter is selected and RPM is chosen
- The material always remains stationary while the machines cutting tool rotates
- As the cutting moves, it presses against the workpiece and shapes the material
| Advantages | Disadvantages |
|---|---|
|
|
Uses: Cuttings gears, produce slots, drilling
Turning:
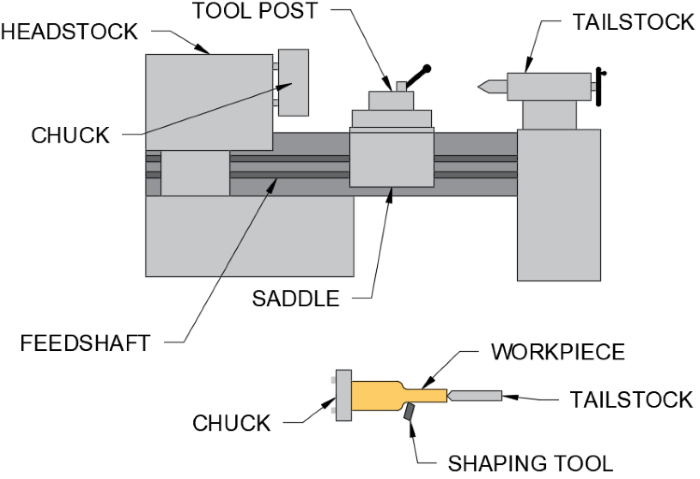
How it works:
- Begin by placing a circular, square or rectangular shaped peice of metal/wood into the lathes drive area
- The metal/wood piece is typically secured using a pressure pad
- Once in place, the lathe is activated to rotate and press the mould against the metal/wood piece
- The rotational force of the lathe then deforms the metal/wood piece to achieve the same shape as the mould
- When metal/wood spinning is performed by hand, a worker manually presses the mould against metal/wood piece
| Advantages | Disadvantages |
|---|---|
|
|
Uses: Table legs, table lamp, engine parts, handles
Note: Turning machines are different depending on the material being used.
Flame Cutting:
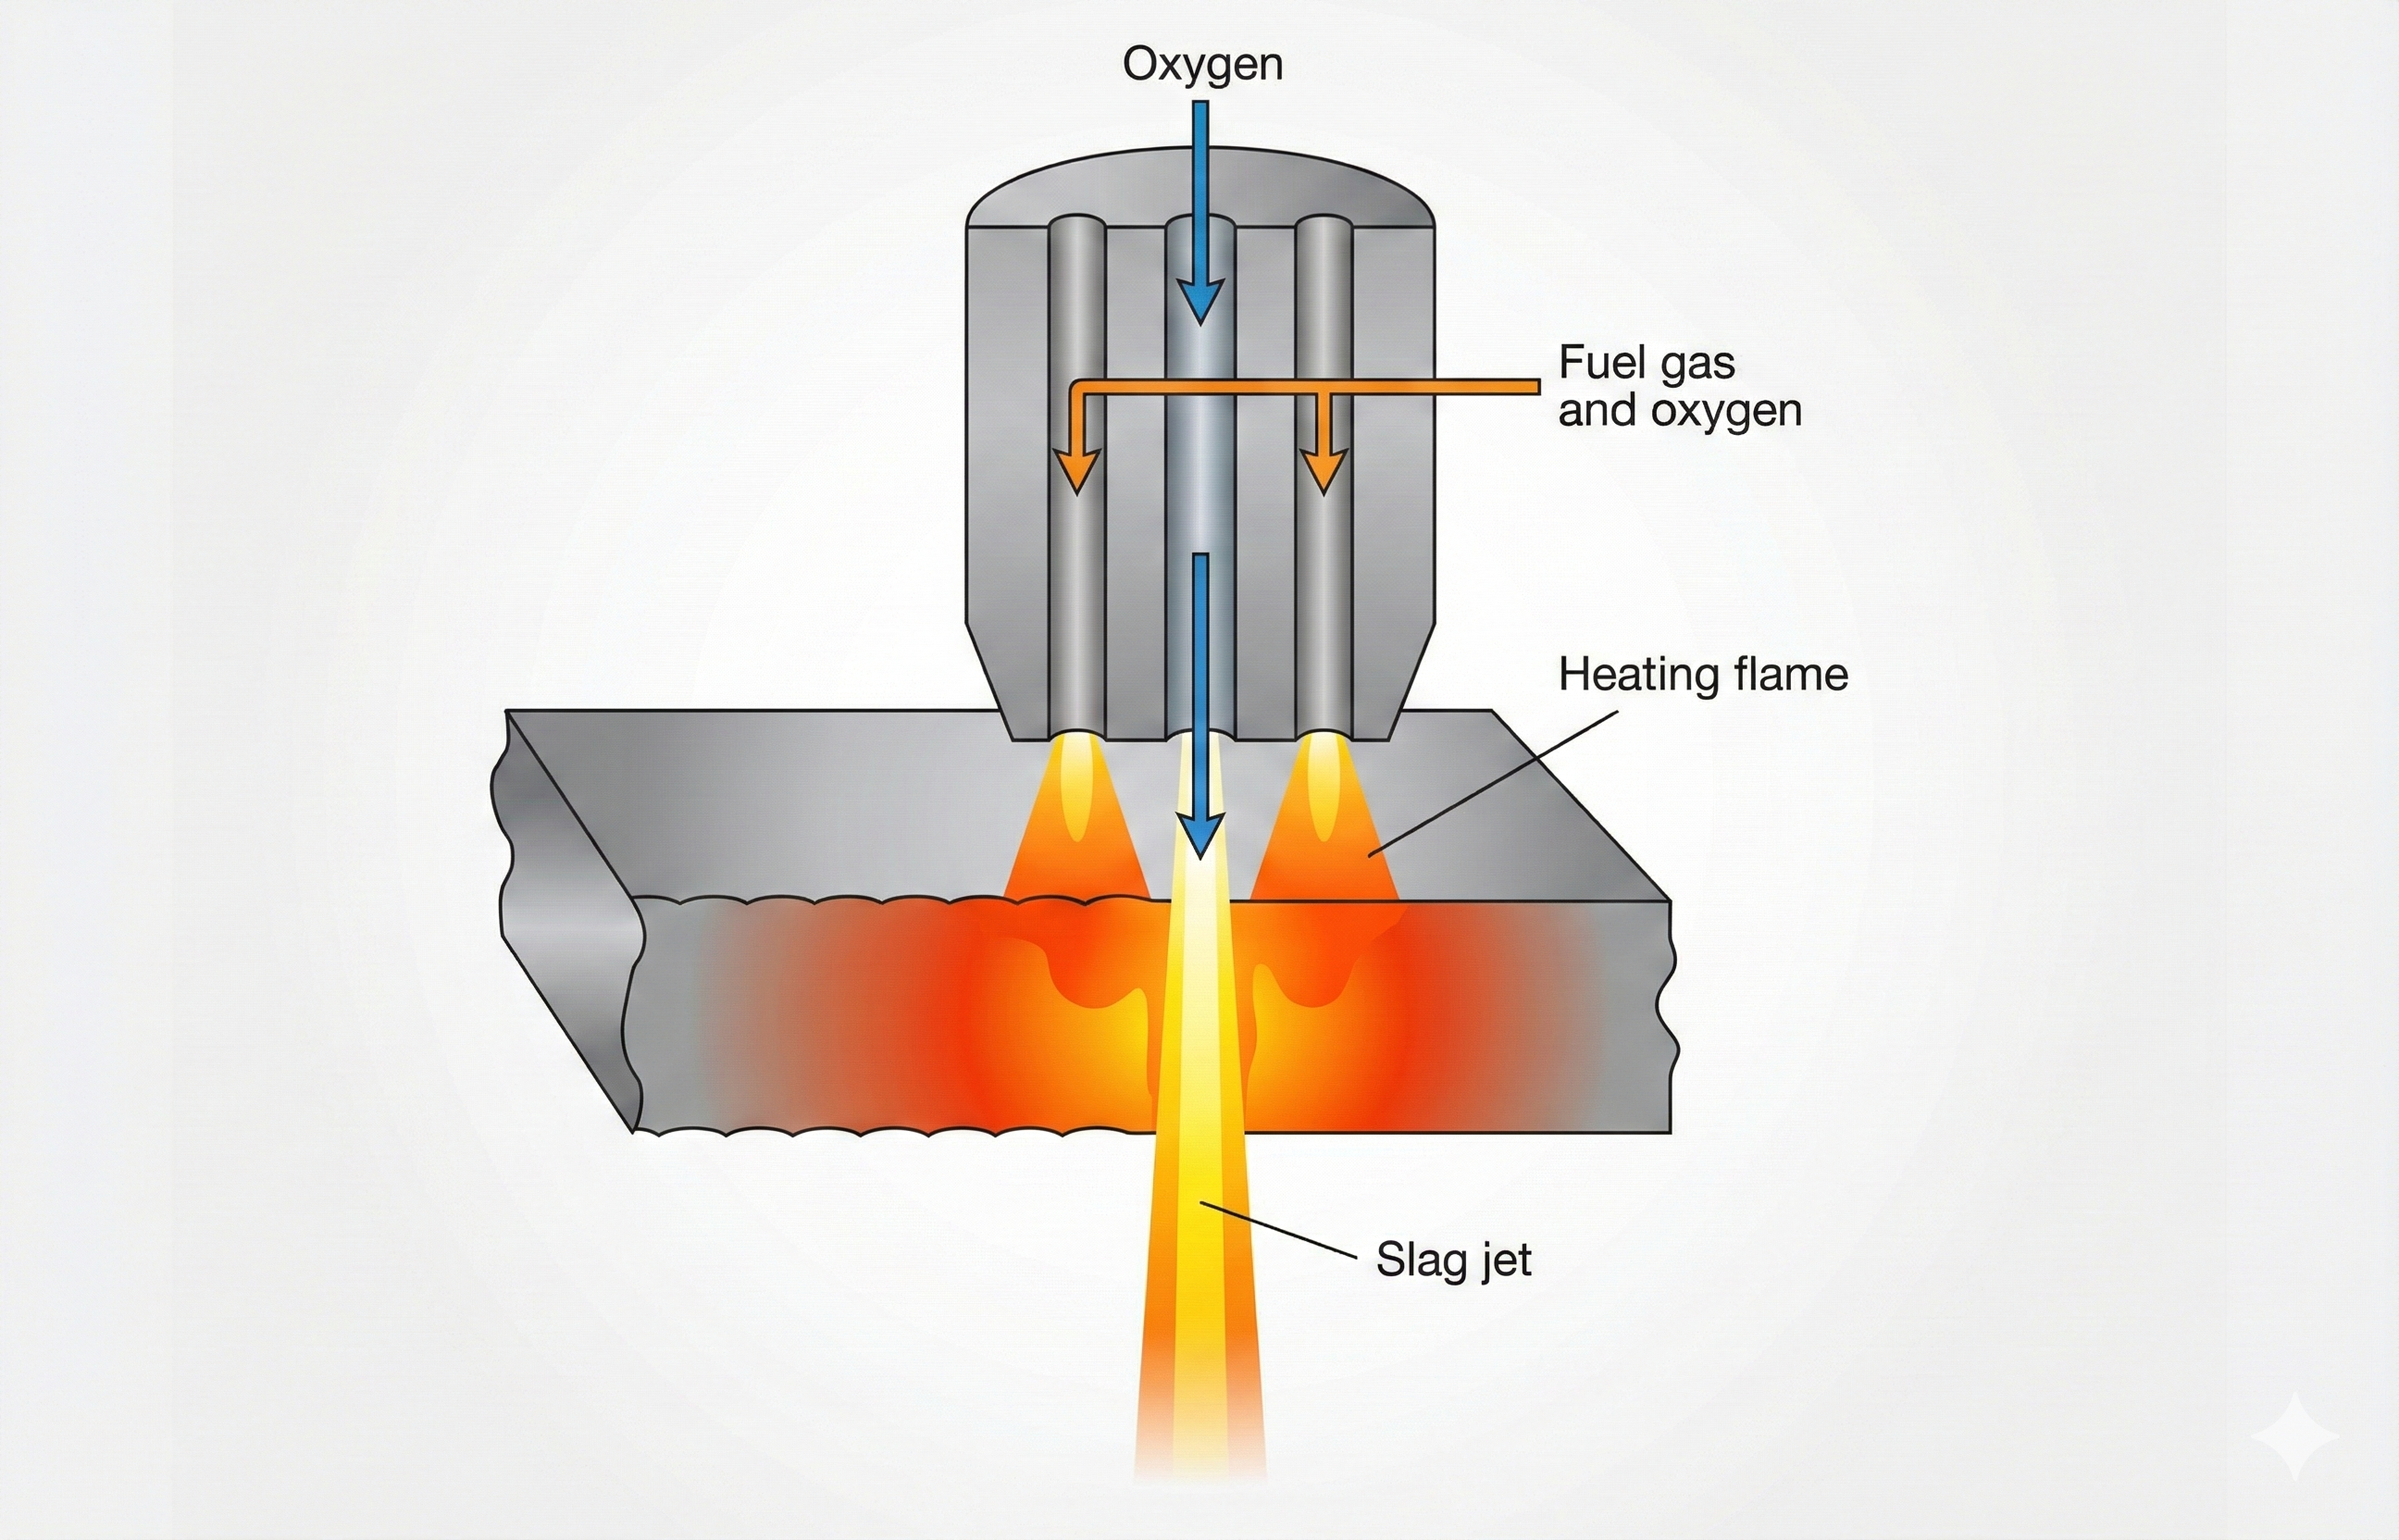
How it works:
- Oxygen and fuel gas (acetylene or propane) are used to heat and melt the material.
- A stream of oxygen is directed at the molten material to blow it away, creating a cut.
- This process is typically used for cutting thicker materials, especially steel.
| Advantages | Disadvantages |
|---|---|
|
|
Uses: Cutting steel, pipes, and plates
Plasma Cutting:
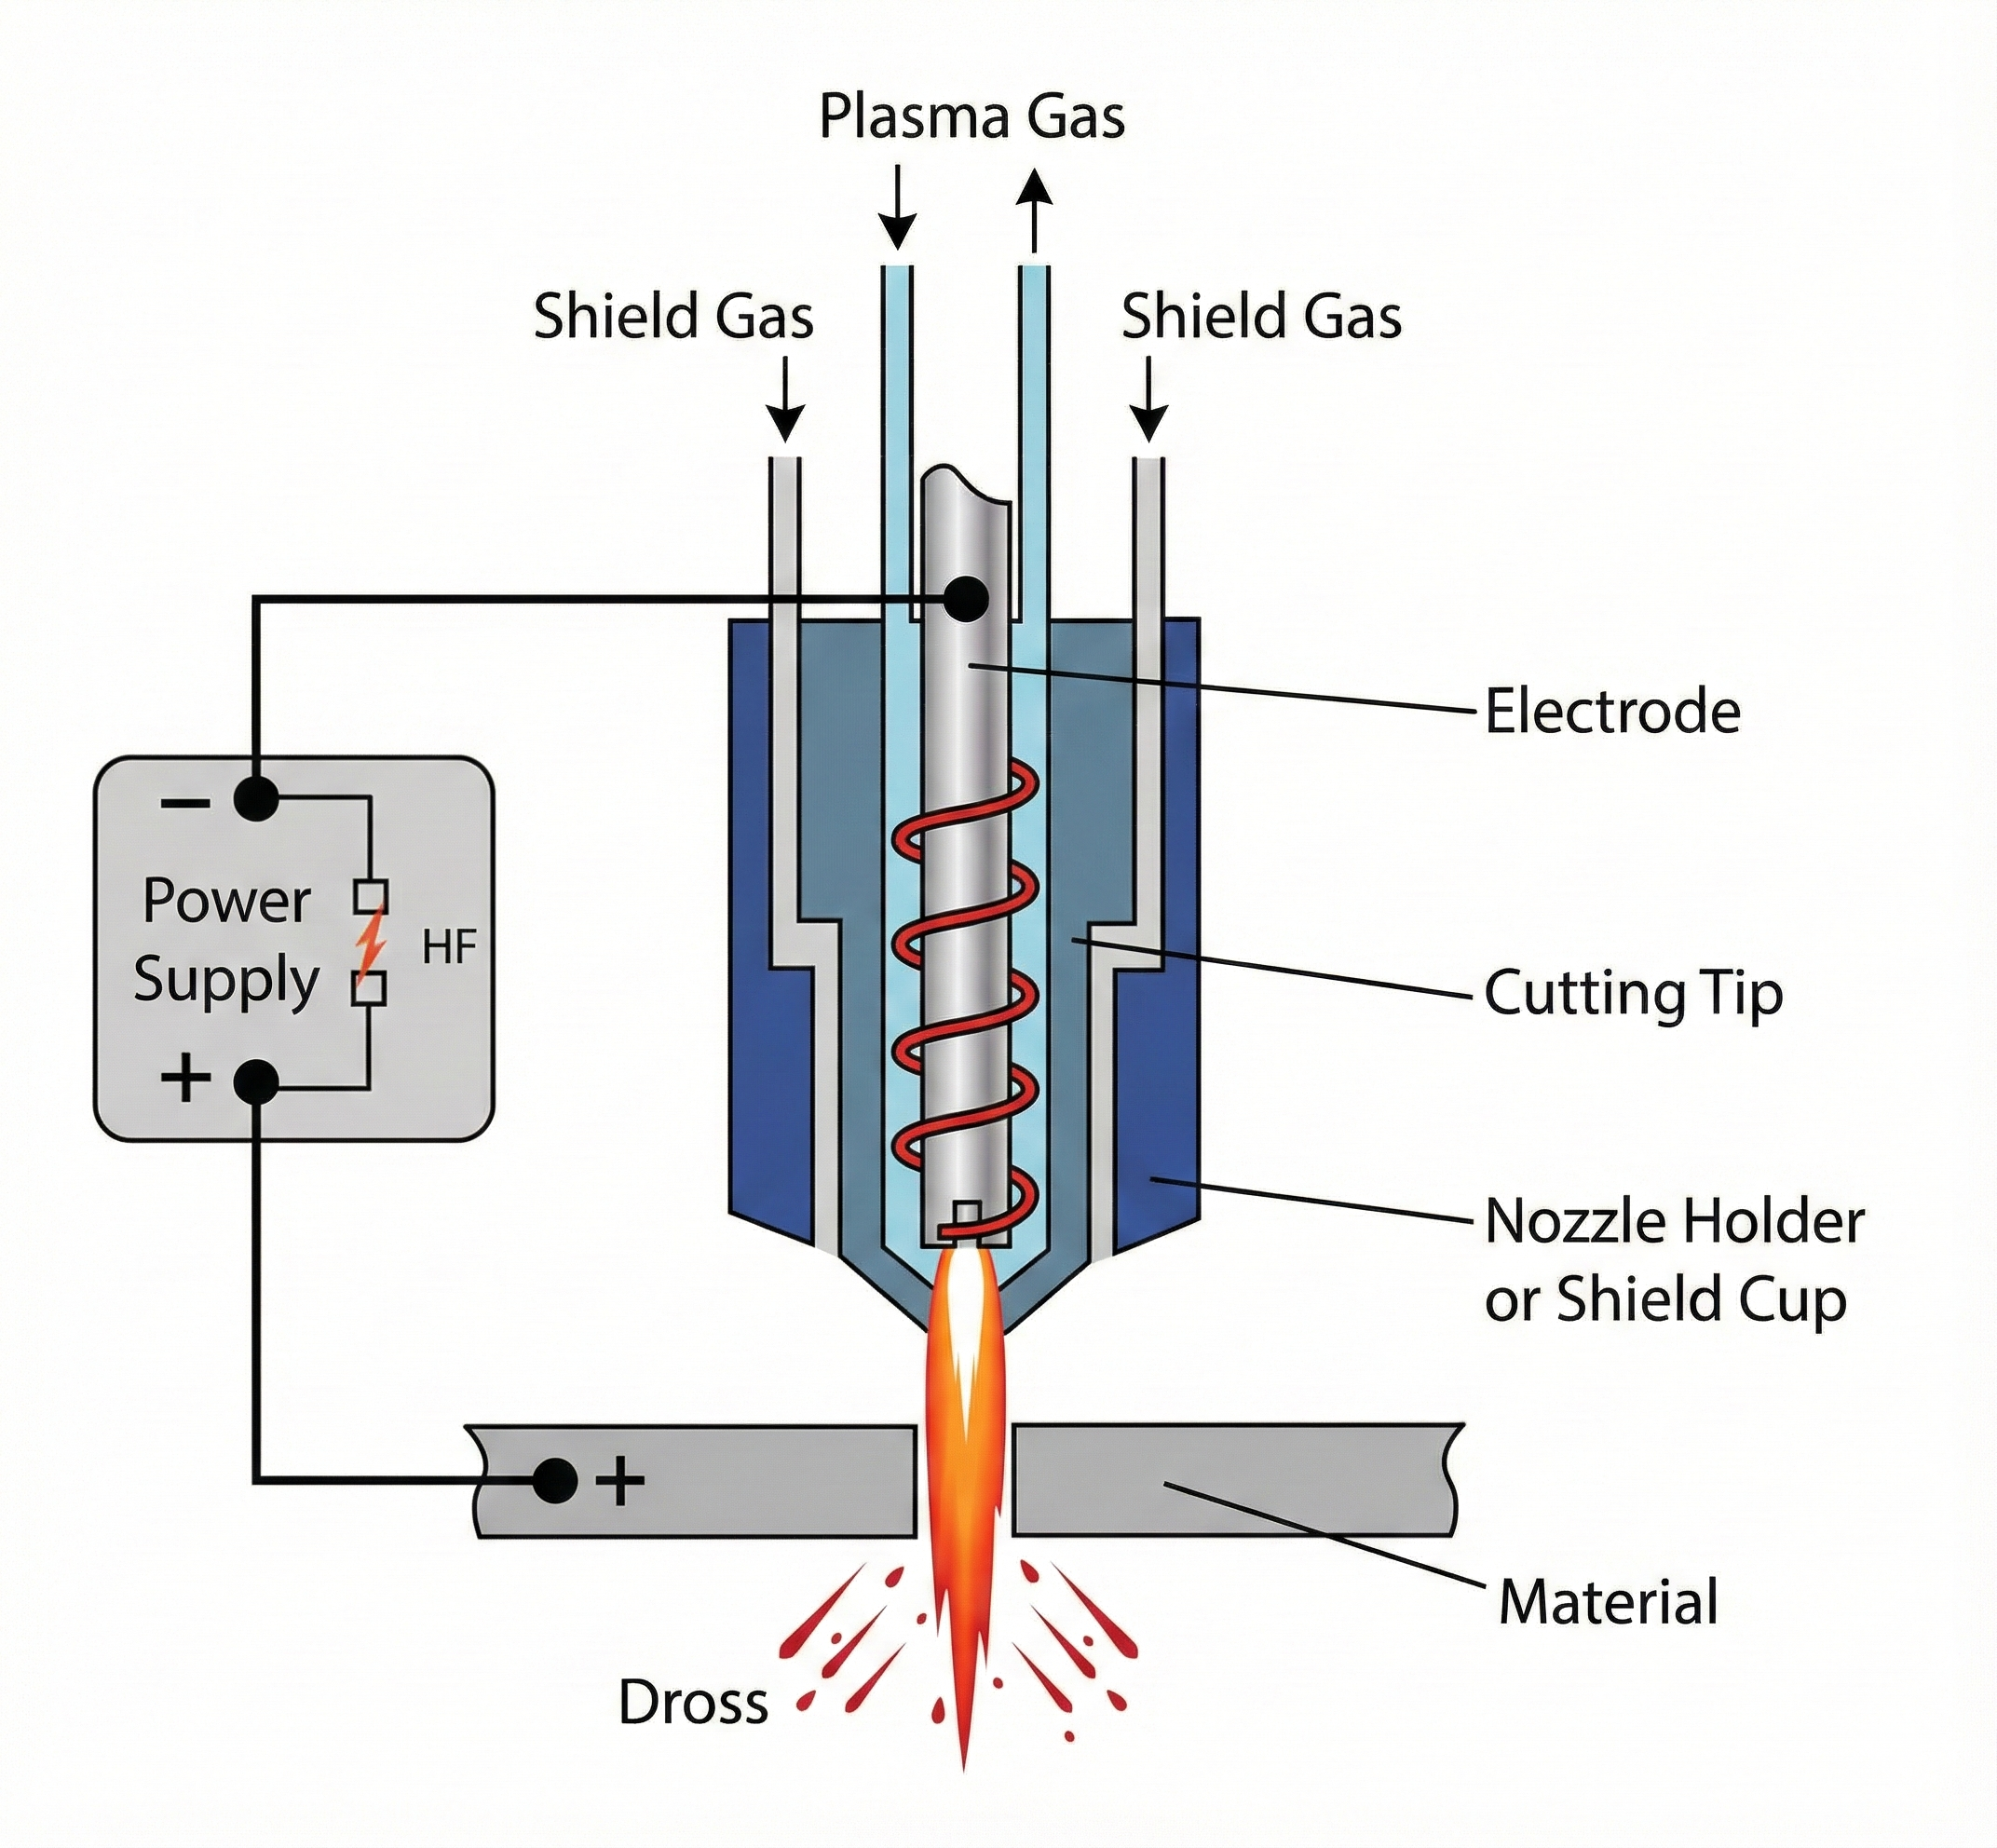
How it works:
- Plasma cutting uses a high-temperature plasma jet to cut through electrically conductive materials.
- Compressed air or other gases are ionized by the electric arc, turning them into plasma which melts and blows away the material.
- Commonly used for cutting metals like steel, aluminum, and brass.
| Advantages | Disadvantages |
|---|---|
|
|
Uses: Sheet metal, heavy machinery, automotive parts
Laser Cutting:
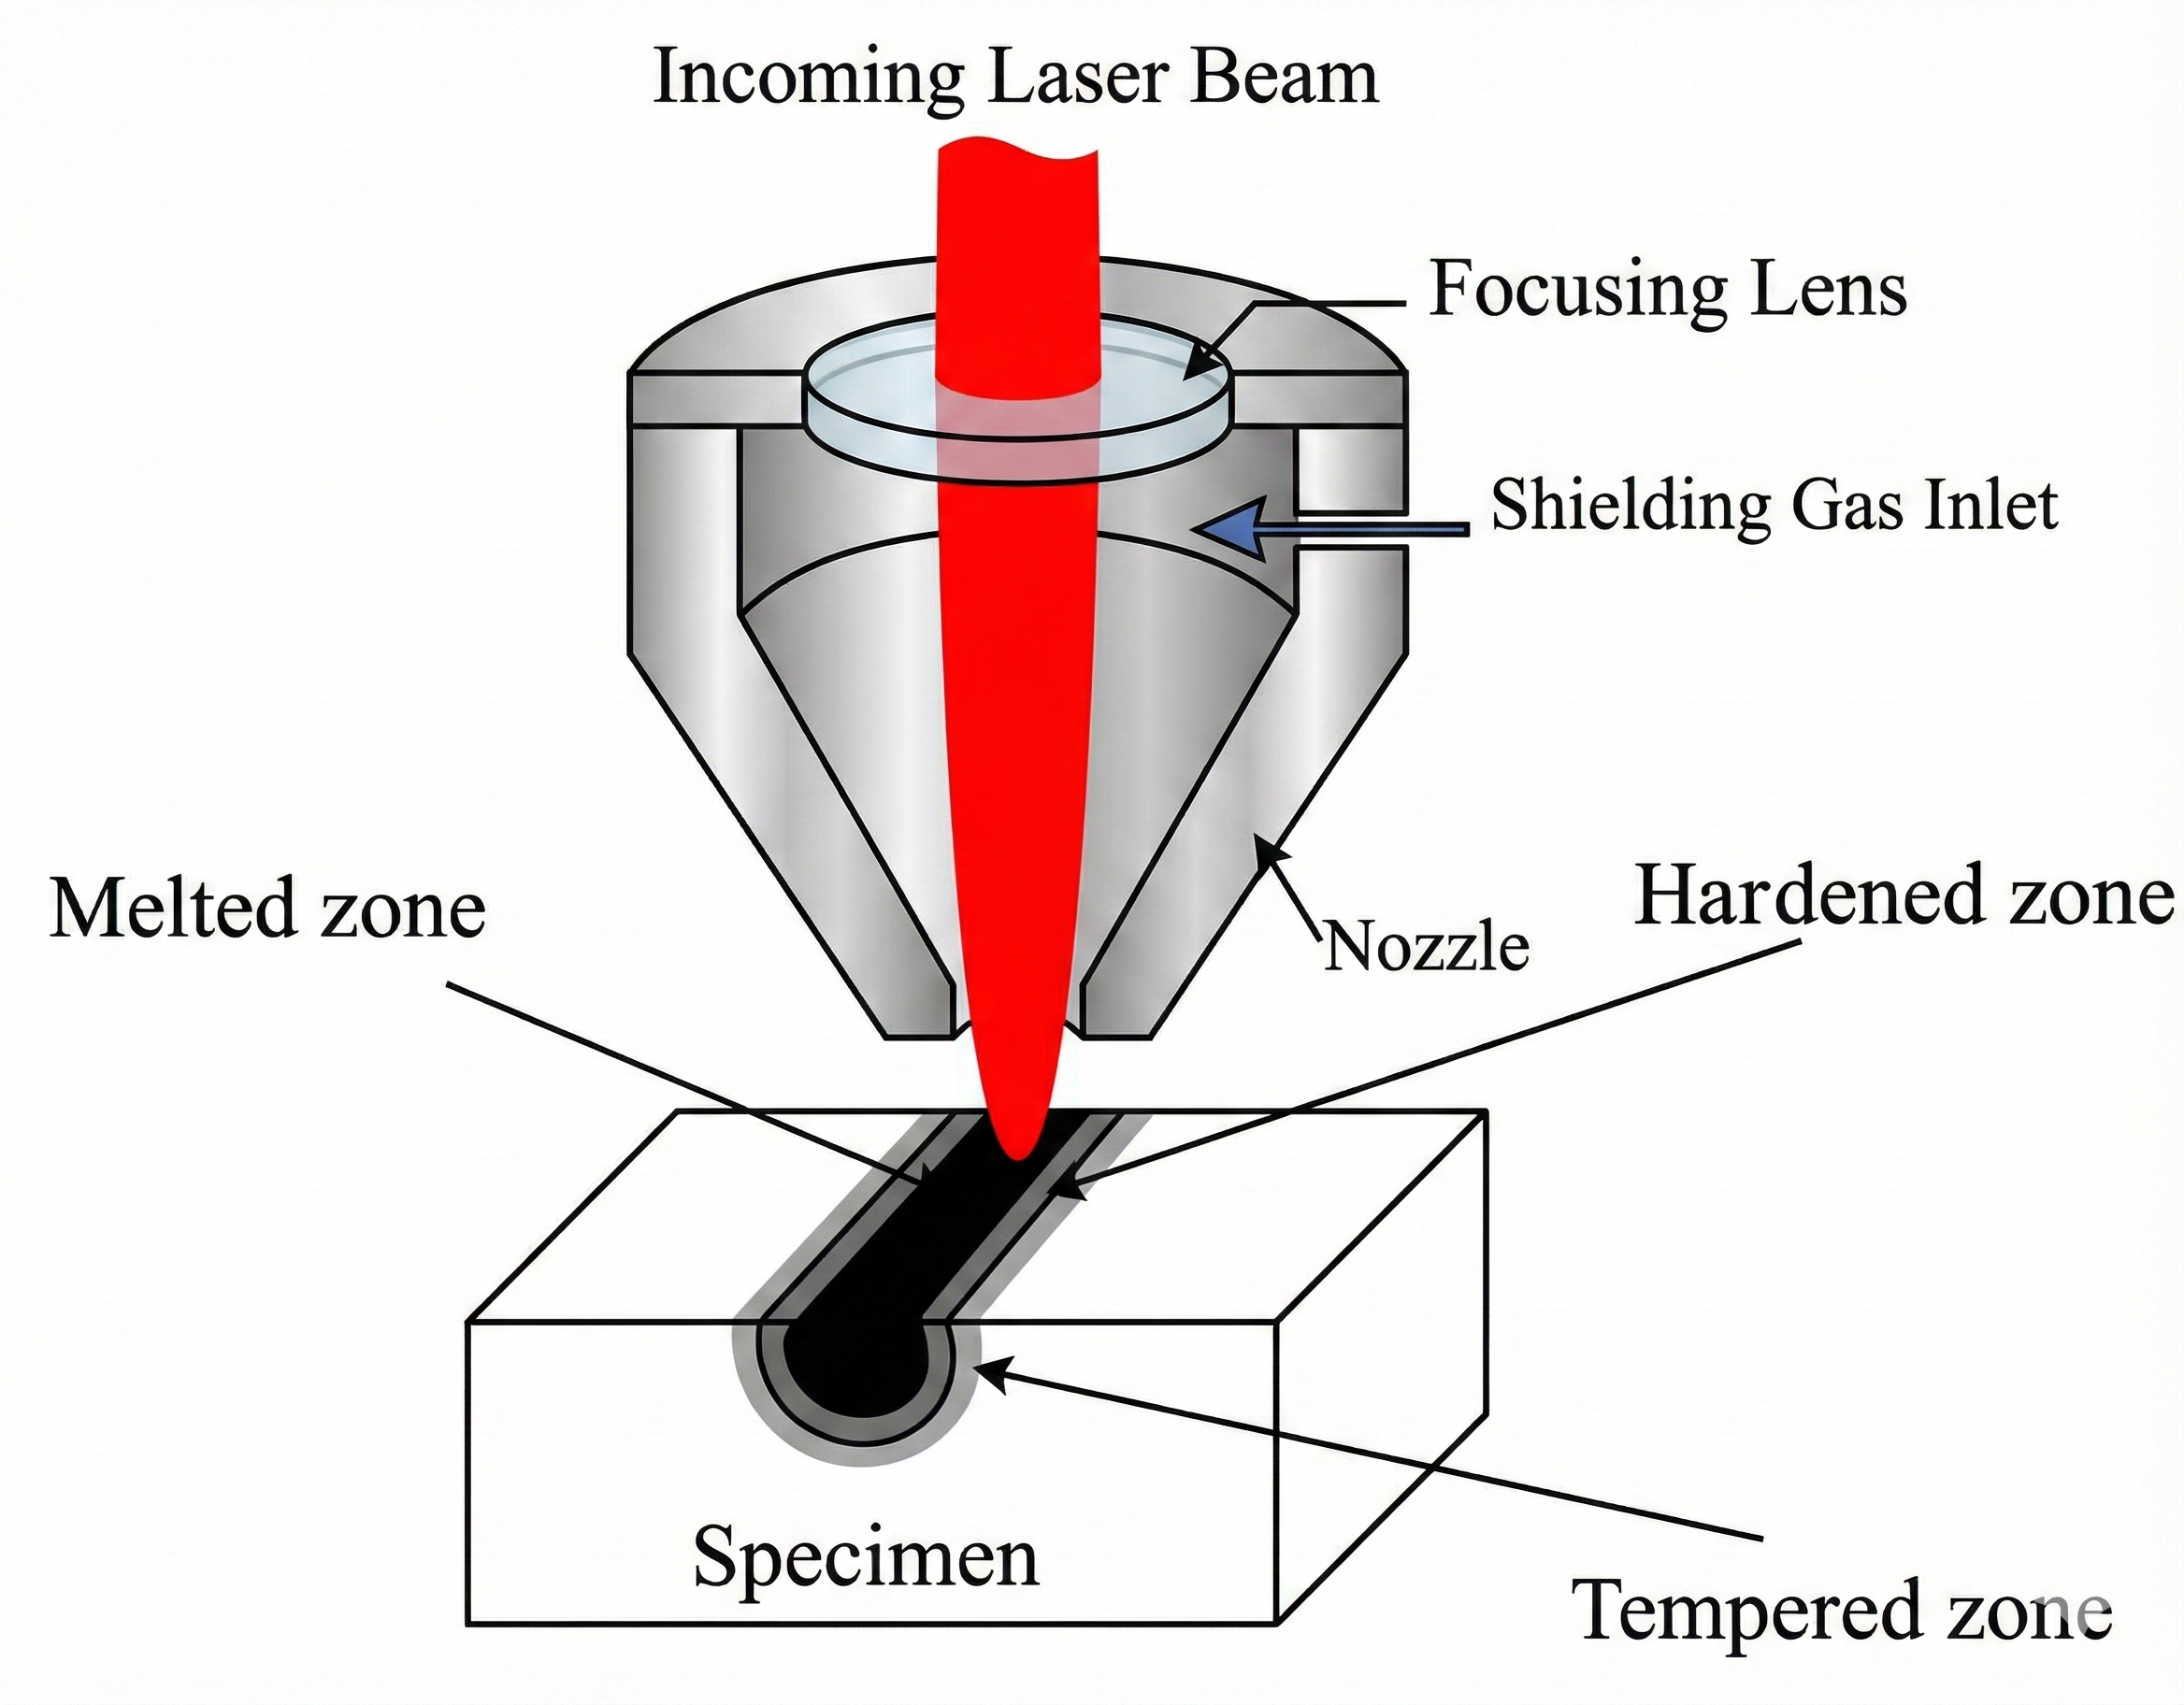
How it works:
- A high-powered laser beam is directed at the material to melt, burn, or vaporize it.
- The laser beam is highly focused and can cut with extreme precision.
- Laser cutting is often used for thin materials and is ideal for intricate and detailed cuts.
| Advantages | Disadvantages |
|---|---|
|
|
Uses: Cutting thin sheet metal, precision components, aerospace parts
Stamping/Punching:
How it works:
- Process is usually done via a CNC
- The CNC program moves the platen carrying the sheet metal
- Once the sheet metal is under the stamp the die is punched against the sheet metal
- The waste material is then recycled and the stamped metal is collected
| Advantages | Disadvantages |
|---|---|
|
|